This is the draft website for Programming Historian lessons under review. Do not link to these pages.
For the published site, go to https://programminghistorian.org
Contents
- Introduction
- What is 0 A.D.?
- Customizing 0 A.D. for Educational Use
- Importing Geographic Data to Create Historical Scenarios
- 1. Choose a Scenario
- 2. Find a Topographic Map
- 3. Modify the Topographic Map Image
- 4. Import the Topographic Map Image into Atlas
- 5. Add, Adjust, and Smooth the Terrain’s Features
- 6. Add Flora and Fauna to the Terrain
- 7. Add Scenario-specific Features
- 8. Save and Distribute the Scenario
- 9. Play the Scenario
- Beyond: Join the Community, Build a Modification from Scratch, and More
- Endnotes
Introduction
0 A.D.: Empires Ascendant is a cross-platform, free and open source real-time strategy (RTS) computer game of ancient civilization building and warfare making. 0 A.D. is the only entirely customizable digital game that is built with real ancient history as one of its guiding principles. It even includes reconstructed pre-modern languages in both written and spoken forms. Playable in singleplayer and multiplayer modes, 0 A.D. is an ideal software platform for history and language instruction.
In this intermediate-level lesson, I presume some experience with installing software and playing computer games. As you progress, you will learn how to use the hackable sandbox that is 0 A.D. to help you teach history and languages. Since your students will need some onboarding with 0 A.D., it is advisable to implement this lesson when you and your students are able to learn side by side.
This lesson should be of interest to you if you are a secondary or post-secondary instructor of any of the following topics related to the pre-modern world, as well as anyone looking to integrate gaming into your adult education:
- Classics and/or ancient history
- Biblical studies
- Medieval studies
- Ancient archaeology
- Ancient languages
In this example, I recreate one of Julius Caesar’s famous battles during the Gallic Wars. However, you may choose to follow these steps to build a different scenario for your own purposes, choosing from a variety of ancient civilizations across Eurasia, Africa, and the Americas.
During the last two weeks of the Spring semester of 2023, I brought 0 A.D. into my own university-level Classical and New Testament Greek class. My objective was to use the game as a tool for team building, historical study, and linguistic practice. This lesson is based on that trial, as well as my hundreds of hours of first-hand experience interacting with the software.
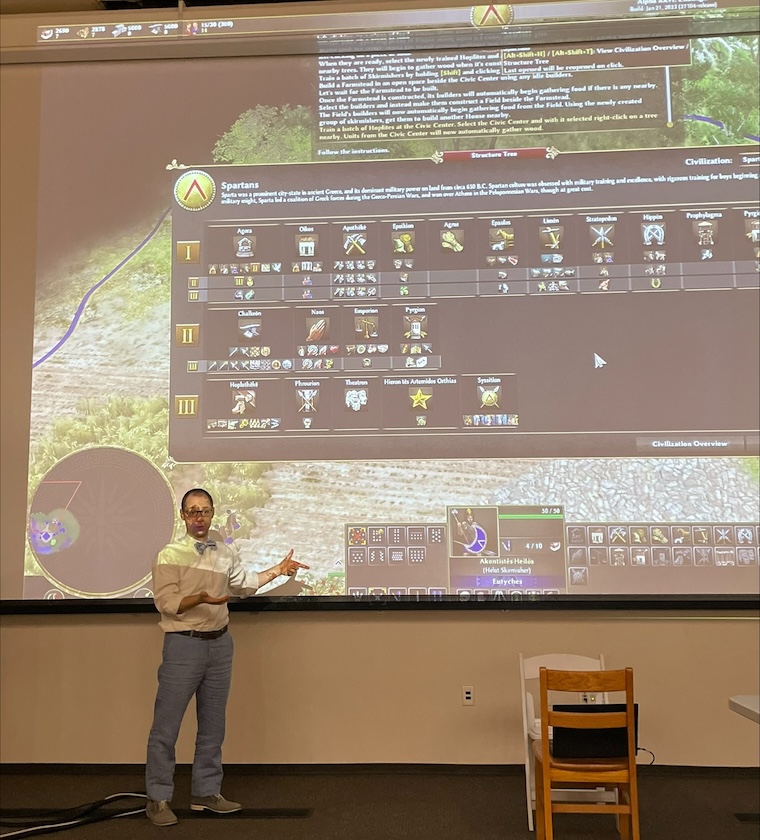
Figure 1. Introducing 0 A.D. to my class via a projector screen.
As Sylvester Arnab, Samantha Clarke, and Luca Morini write in their 2019 article “Co‑Creativity through Play and Game Design Thinking”, ‘students discover the importance of elements such as empathy, purpose, meaning, art, creativity, and teamwork in their [game-based] learning regardless of the specific disciplines they are pursuing.’1 If creativity is found at the intersection of apparently disconnected subjects, then it would be challenging to think of a more creative partner for secondary or post-secondary education than cooperative real-time strategy (RTS) game design and gameplay.
0 A.D. Gameplay
When the game begins, you (in the role of an ancient civilization’s controller) and your few starting units, who are humbly in the early Village Phase of development with few technologies available, find yourselves isolated from the rest of the world. You are unable to interact with anything beyond the small parcel of land that you control until you have sent scouts to explore beyond your territory. You must scramble to gather food and resources to build houses, farms, and barracks, using the technologies that your civilization actually possessed in its time.
Gradually, you coordinate with your allies – 0 A.D. is best enjoyed in multiplayer mode – to build a sophisticated trade network, advancing first to the Town Phase and then, eventually, the mighty City Phase. By researching historically accurate technologies and constructing many true-to-life buildings, your civilization becomes capable of creating an ever more sophisticated economy and army. Each civilization has its own realistic economic and militaristic advantages and disadvantages, which you must collaboratively exploit with your allies in order to defeat your enemies, ultimately achieving shared control over the entire geographic region.
While you progress toward the goal of regional control, you learn a great deal about the economic, militaristic, and linguistic aspects of the civilizations in your game – possibly even more than you would learn over the same amount of time doing traditional classwork.
Learning Outcomes
After completing this lesson, you will be able to:
- Understand what the 0 A.D. community project is, how to use its documentation, and why it may be said that the game is well-rooted in history and linguistics
- Use 0 A.D. inside a history or language class for productive group study
- Handle the simple customization options available for 0 A.D., including community-made gameplay modifications
- Build your own realistic historical scenario by importing real-world topography and crafting a playable scene atop it
- Begin drafting your own stand-alone 0 A.D. gameplay modification
Requirements
This lesson is structured so that you only need basic familiarity with real-time strategy (RTS) gaming and image editing. For advanced work based on later sections of the lesson, some familiarity with computer coding would be helpful, but no programming knowledge is required.
0 A.D.’s complete user interface (UI) is available in many modern languages, including all four of Programming Historian’s (English, Spanish, French, and Portuguese), and its gameplay features several ancient languages, such as Latin and Classical Greek.
Basic Installation
0 A.D. is accessible on every major desktop operating system (OS).2 For Apple MacOS or Microsoft Windows, the best place to find an installable package is on the 0 A.D. website’s Download page. For a libre Unix-like OS (such as GNU/Linux or a BSD), the best place to find an installable package of the game is the OS’s own package repository.
Advanced Installation and Setup Notes
Per the official minimum hardware requirements for 0 A.D., the game should run on a majority of 32-bit or 64-bit x86 computer systems that are in operation for home and/or office use today, and the game can be compiled on ARM.3
Users of Unix-like OSes may elect to compile the game from source.
For multiplayer testing and/or gameplay, whether over a Local Area Network (LAN) or the Wide Area Network (WAN, i.e. the internet), it is best practice to set up all players on wired network connections (rather than wireless/WiFi). Doing so reduces the risk of game stutters or crashes. If students are using laptops rather than desktop machines, simple USB to RJ-45 (‘Ethernet’) adapters can faciliate easy wired networking. Otherwise, if the wireless network itself is stable, wireless networking may suffice (I have successfully fallen back on this arrangement with students myself).
Image Editing Software (GIMP or other)
In this lesson, you will learn to use the free and open source GNU Image Manipulation Program (GIMP) to prepare real-world topographical data which you’ll import into 0 A.D. If you already know how to use another image editing program (such as Adobe Photoshop), then you ought to use that instead, replacing the lesson’s steps with the equivalents in your chosen program.
Like 0 A.D., GIMP is available for every major desktop OS. For Apple MacOS or Microsoft Windows, the best place to find an installable package is on the official GIMP website’s Downloads page. For a libre Unix-like OS (such as GNU/Linux or a BSD), the officially recommended way to install GIMP is via the OS’s own package repository.
GIMP has modest hardware requirements (lower than 0 A.D.).4
What is 0 A.D.?
The 0 A.D. project was formed by the partnership of at least three computer gaming communities who were separately making gameplay modifications (‘mods’) for Ensemble Studios’ famous Age of Empires (1997) and Age of Empires II (1999) RTS games. Age of Empires II in particular was instrumental in defining the multiplayer RTS genre, serving as a standby of LAN parties for many years and frequenting many major publications’ lists of the best/greatest video games of all time. Modifying this game, for example by incorporating new civilizations, has been popular from its launch.
Through interactions on the long-running Age of Kings Heaven Forums, a discussion zone for fans of the Age of Empires games, the members of the three communities decided to collaborate to create a wholly new game that would be historically and strategically richer than they had found to be possible by modifying the Age of Empires titles. Wildfire Games, the umbrella organization that they formed together circa 2002, now oversees the 0 A.D. project as a whole.
In 2009, the project leaders decided to make the game’s source code public under open licenses, which allowed the project to progress much faster than in its earliest years. Not only did that decision open the door to the large number of mods available, but it also solidified 0 A. D.’s rare status as a completely cross-platform game, in which eight players can interact seamlessly across eight different machines.
As of May 2025, the current stable release of the base game (Alpha 27) features multiple ancient civilizations, all of which have believable architecture, attire, technology, military techniques, and heroes – plus, as much as possible, restored pronunciation of their original languages. The current list of playable civilizations is as follows (ordered alphabetically): Achaemenids, Athenians, Britons, Carthaginians, Gauls, Hans, Iberian Tribes, Macedonians, Mauryans, Ptolemies, Republican Romans, Seleucids, and Spartans.
A Historically Accurate Community Endeavor
In a 2006 interview with Jason Adams of gamedev.net, Paul Basar (a member of the History Department of Wildfire Games) said the following about his team’s attention to historicity:
[Historical] accuracy is of the highest priority, with all weapons, helmets, armor, and shields to be of historical provenance. Literally dozens if not hundreds of historically accurate armor and weapon props have been modeled and textured, with more to come. Buildings are designed according to the style and appearance of their historical counterparts. Even the sound effects of construction have been made unique for each civilization to show the varied materials used by each people. Unit types are given in their original language, as close as can be determined… Each soldier, woman, priest, and trader is given an original personal name from his or her culture. Naval warfare has also been rigorously researched and planned by Ken Wood, our chief designer, promising one of the best historical naval combat experiences yet seen in an RTS. This is only a small sampling of the effort going into historical accuracy in 0 AD.
As the Wikipedia article about 0 A.D. says, ‘the historical accuracy of the game elements has been the highest development priority.’ The name 0 A.D., however, seems to serve as a reminder that, while the game has many true-to-life elements, it remains a game. The Han Dynasty and the Spartan Empire, for example, were never at war with each other, nor did they even overlap temporally. The historical accuracy of 0 A.D. is not in the reality of specific civilizations encountering each other but, rather, in the details of each civilization itself. The Spartans are designed with the militaristic, economic, domestic, cultural, and religious trappings from their peak as the Spartan Empire, as are the Hans in their own way. The game might be best understood as an imagined clashing of multiple real, prominent civilizations between 500 BCE and 500 CE. 0 A.D. is the year that never was: a fictional nexus between civilizations and events that really were.
An example of the game’s balance between authentic historicity and engaging mechanics is the interoperation of the three main classes of human units: female citizens, citizen soldiers, and champions. As explained in the Game Manual, female citizens are the ‘driving force of your economy’. They specialize in gathering resources, especially food, and they are effective builders. They can attack invading units, but they are quickly outmatched in combat even by the weakest citizen soldiers. Citizen soldiers may gather resources, build, and fight. They have bonuses for collecting wood, metal, and stone. They are stronger than female citizens in combat, and they are able to lay the foundations for some military structures that female citizens cannot, but they also require more available resources to train (create). Furthermore, they are outmatched in combat by the third class of units, the champions. Champions are professional soldiers. They are the most expensive units to train, and they are incapable of gathering resources or building. Deploying them requires a deeply established economy, normally operated by a balanced mix of female citizens and citizen soldiers. Obviously, there never has been a time in human history in which roles have been so clear cut. Still, the fact that different sets of people play different roles inside a civilization, and that the units themselves are designed with attention to history, leaves real fodder for class instruction.
Linguistic Practice and Contribution
If you are teaching an ancient or modern language, the most effective way you and your students could contribute to the 0 A.D. project is by improving the game’s languages, either by working on an existing language or by adding a new one.
Not all of 0 A.D.’s civilizations have audio recordings of their respective ancient languages. In the Wildfire Games Wiki’s Audio Voice List, you’ll find which new translations are needed for in-game speech, as well as up-to-date instructions on how to submit them. As of May 2025, the three ancient languages whose audio is fully implemented are Late Egyptian, Ancient Greek (both Attic and Koine), and (Classical) Latin. Meanwhile, there are open calls for Sanskrit and Old Persian, and the project’s leaders have placeholders for (Old) Welsh and/or Anglo-Saxon, (Classical) Hebrew, and Basque.
Wildfire Games also relies entirely on community translators for its user interface (UI). In the official Transifex page for 0 A.D., there are (as of May 2025) over 48,000 word strings in the default (American) English language, and the project managers have listed 122 languages (and counting) at every stage of translation. Contributing to a language for the UI, whether ancient or modern, would be a great project for any university-level language class. Another way to enjoy linguistic practice within a language class would be to play the game together, with the UI and the civilization’s in-game interactions set to the target language.
This way of combining translation work with gameplay would make a compelling learning scenario. For example, students learning Latin might work the Latin translation of the UI for one portion of a class period, and then play as the Romans (who are fully playable with in-game Latin) for another. Thus, they would be engaging with Latin by writing it (tactilely), reading it (visually), and hearing it (aurally), as well as (presumably) by speaking it aloud (orally) with each other and the instructor.5
Customizing 0 A.D. for Educational Use
Another aspect of 0 A.D. that makes it compelling for educational use is that the game itself is fully customizable. Here, I introduce you to the three main ways to transform the game into a customized tool for your own didactic purposes, from simplest to most challenging:
- Finding and installing community-built gameplay modifications
- Importing real-world geographic data to create a realistic historical scenario using Atlas, the game’s built-in terrain and scenario editor
- Building your own modification from scratch
Installing Community Gameplay Modifications
The easiest way to customize 0 A.D. for your class is to make use of prepackaged community gameplay modifications (or ‘mods’). You’ll find dozens to hundreds of mods hosted at various places on the web that are compatible with the most recent game release. Since 0 A.D. was founded by game modifiers (‘modders’), the game was built to make installing and using these mods straightforward.
In fact, 0 A.D. comes with a built-in mod installer and a selection of click-to-install community mods which have been verified for safety and uploaded to mod.io’s 0 A.D. set.
After launching the game, from the main menu, click Settings > Mod Selection.
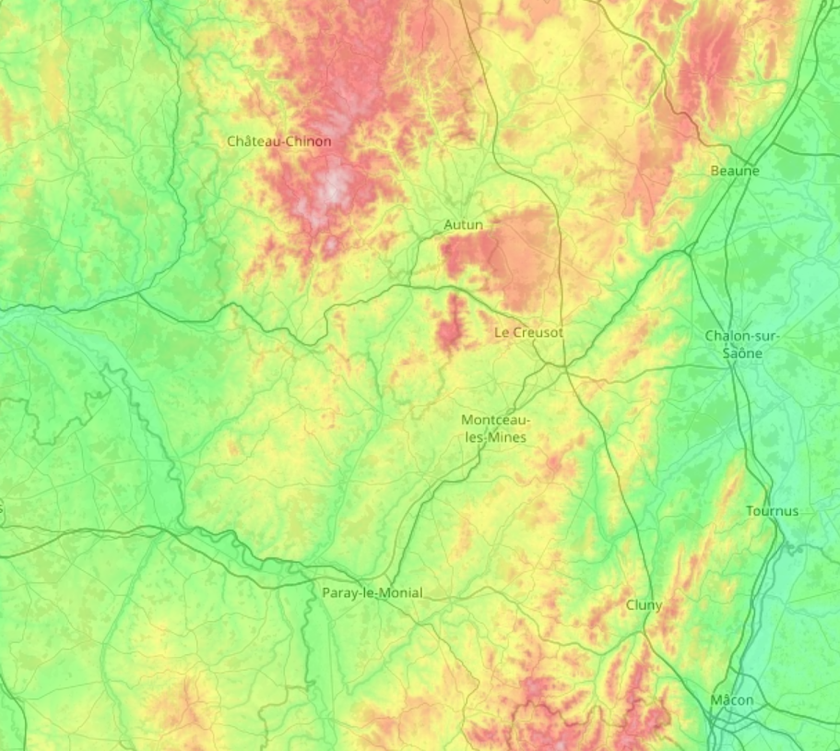
Figure 2. In-game Settings menu option for mod selection.
Next, click Download Mods (on the bottom task bar) and then Accept (mod.io’s Terms of Service) to be greeted with the full list.
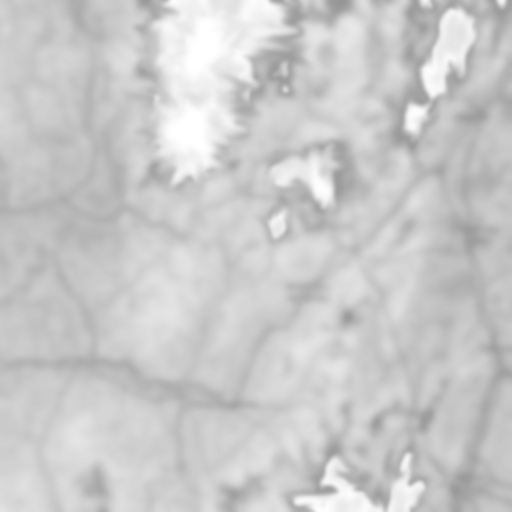
Figure 3. Accepting mod.io’s Terms of Service.
Then, select a mod and click Download.
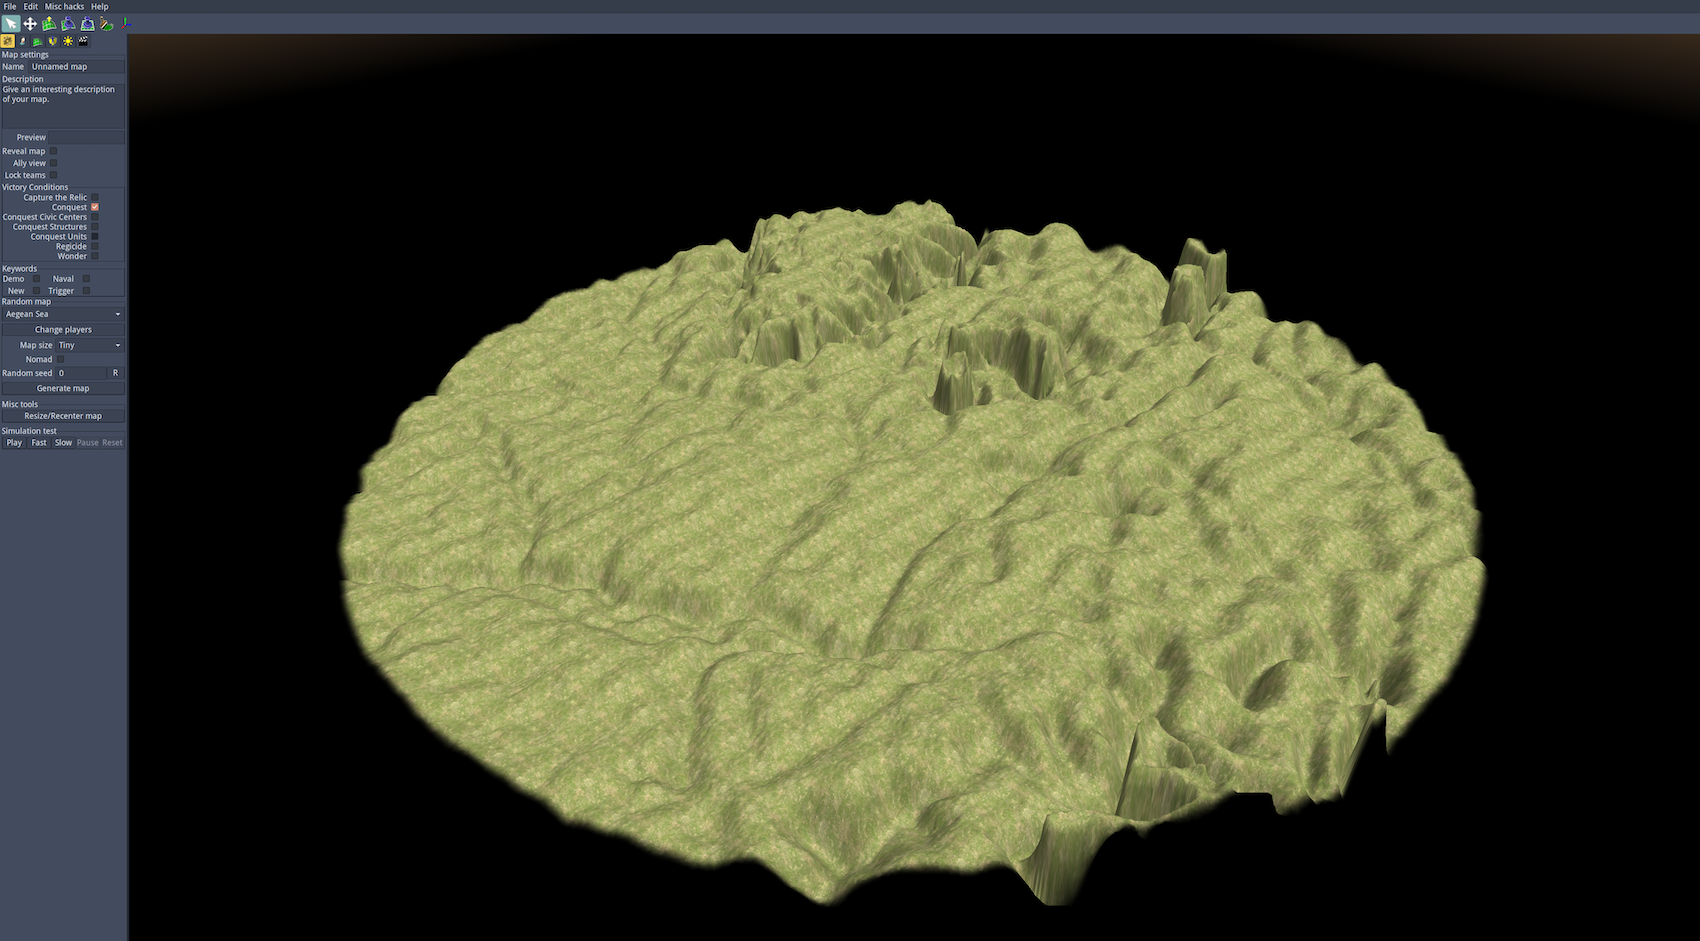
Figure 4. Downloading a mod.
You’ll need to enable the mod(s) by clicking on them and then Enable on the bottom task bar.
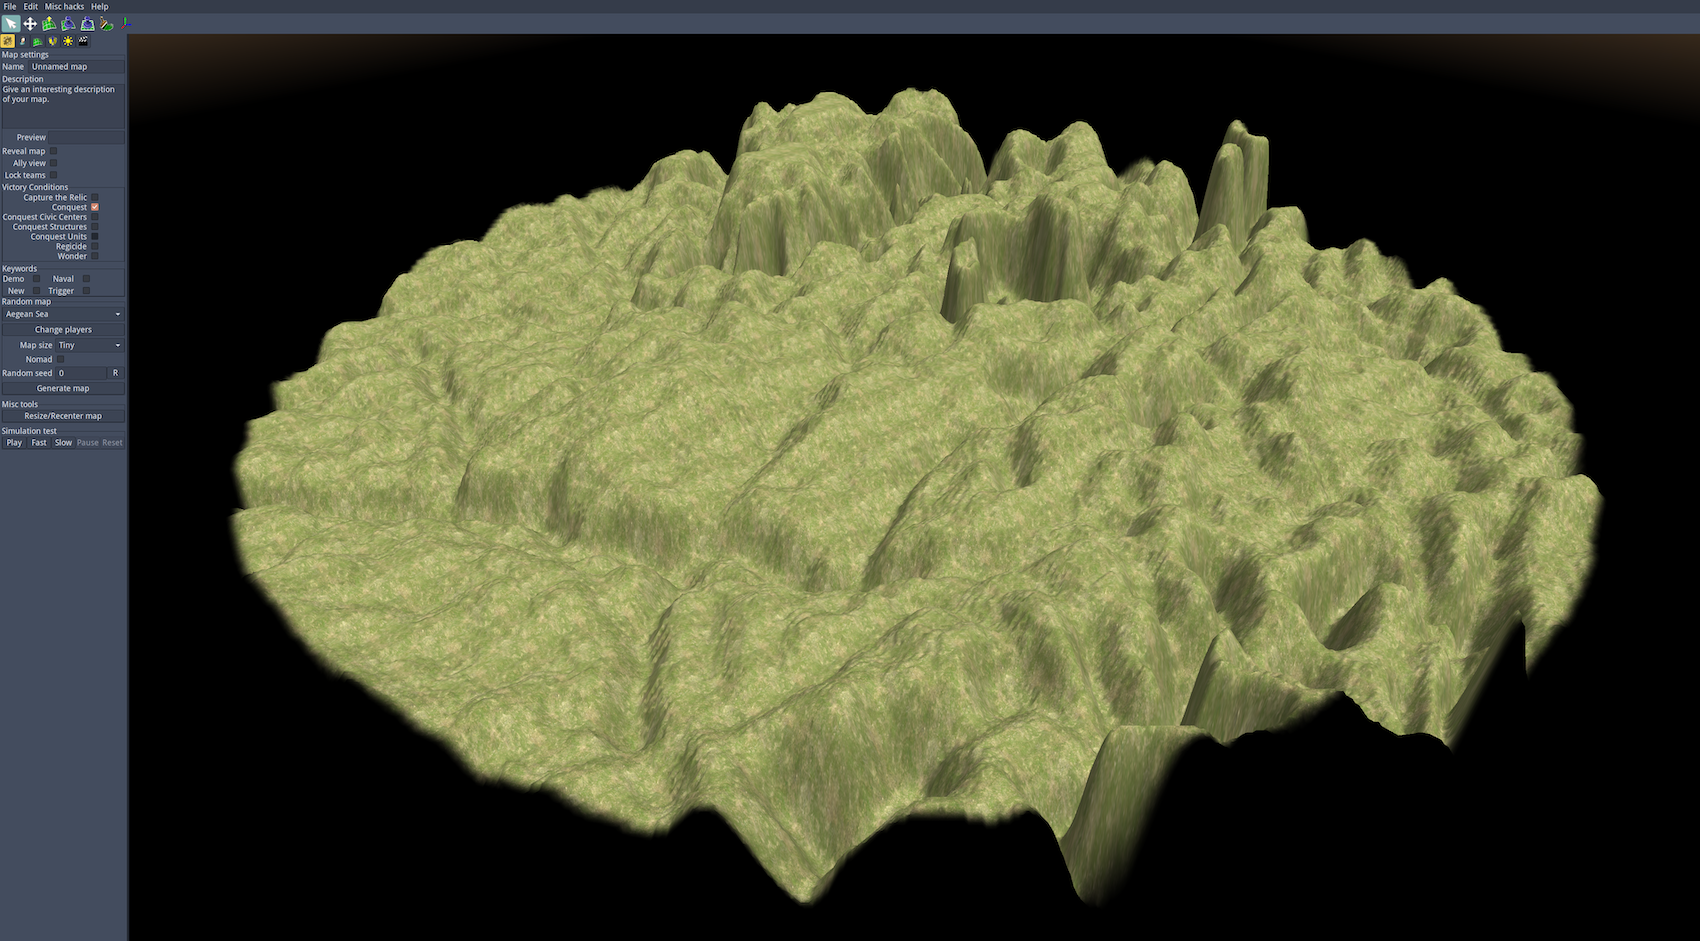
Figure 5. Enabling a downloaded mod.
Finally, click Save and Restart to relaunch the game with your chosen mod(s) ready for use.
Two Recommended Mods
Two regularly updated mods with plenty of features that might be of particular interest to you are Community Maps 2 and Delenda Est.
Community Maps 2 adds a large, curated set of high-quality gameplay terrains. It is my opinion that every 0 A.D. installation should include this mod, since it adds diversity to the base game without changing its mechanics.
Delenda Est brings major additions to the base civilizations and gameplay, all oriented toward historical realism and depth of strategizing. Among many new features, Delenda Est introduces a fourth phase called the Empire Phase, multiple new civilizations (as of the time of writing, these include Imperial Romans, Scythians, Suebian Germans, Syracusans, Thebans, Xiongnu, Yamatai Japanese, and Zapotecs), many options for a special start-of-game hero that yields different bonuses, enslavement of foreign people, cultic worship, majorly reworked economics, and more.
While I have many good things to write about Delenda Est, I only recommend that you bring it into your classroom if you are able to schedule multiple hours to learn the gameplay mechanics. The base game has a modest but non-negligible learning curve, and Delenda Est further steepens it. Delenda Est is only suited for multiplayer use, since AI (computer) players are not programmed to handle its special mechanics.
Manual Mod Installation
Installing a prepackaged mod outside of 0 A.D.’s built-in mod.io menu (for example, downloaded directly from a repository on GitHub) is trivial by design. With a mod downloaded in .pyromod (custom Pyrogensis package) or .zip format, right-click the file and select Open with 0 A.D.. You can even do this in the command line with pyrogenesis [file].pyromod or pyrogenesis [file].zip. Then, enable the mod inside the same in-game mod.io Mod Selection menu.
Alternatively, you could move the entire mod folder into */mods yourself, without having the game engine handle the installation, but you must make sure that your mod’s parent folder and the .zip it contains are under the same name as that listed in the mod’s mod.json file. To install the mod manually, locate */mods in the game’s installation directory. The Wiki currently specifies the following folders:
- On Windows,
C:\Users\{name_of_user}\Documents\My Games\0ad\mods\, - On MacOS,
~/Library/Application Support/0ad/mods/ - On Unix-like OS,
~/.local/share/0ad/mods/.
Copy and paste the mod’s parent folder (the entire mod) into that folder, then enable the mod inside the in-game Mod Selection menu.
For more information, check out the 0 A.D. Wiki’s official directions for manual mod installation.
Next Steps with Community Mods
I recommend that you start by installing and enabling Community Maps 2 via the game’s built-in mod.io menu, and try some of its lovely terrains while you familiarize yourself with the base game. Then, move to Delenda Est or another of the many vetted mods for new civilizations or other features that might be relevant for your classroom. Millenium A.D., for example, which is focused on the ninth and tenth centuries CE, offers playable iterations of the Anglo-Saxons, Byzantines, Carolingians, Norse, Rus, and Ummayads. As of May 2025, it is more of a work-in-progress than Delenda Est, but it already has tens of thousands of downloads.
Importing Geographic Data to Create Historical Scenarios
You might wish to create your own custom historical scenarios in 0 A.D., or you might have your students create these scenarios themselves as a class project. For the most immersive experience possible, it is best to import real-world geographic data into the game.6 While you work through the steps outlined below, I recommend that you keep the official Atlas Manual open in case you should need additional information about how to use 0 A.D.’s built-in terrain and scenario editor. Also, as a preparatory note, whenever you click Save (or Save As) inside Atlas, make sure that you always select a ‘scenario’ – not a skirmish or tutorial. Scenarios contain predefined civilizations, teams, units, and so on, while allowing full multiplayer gameplay.
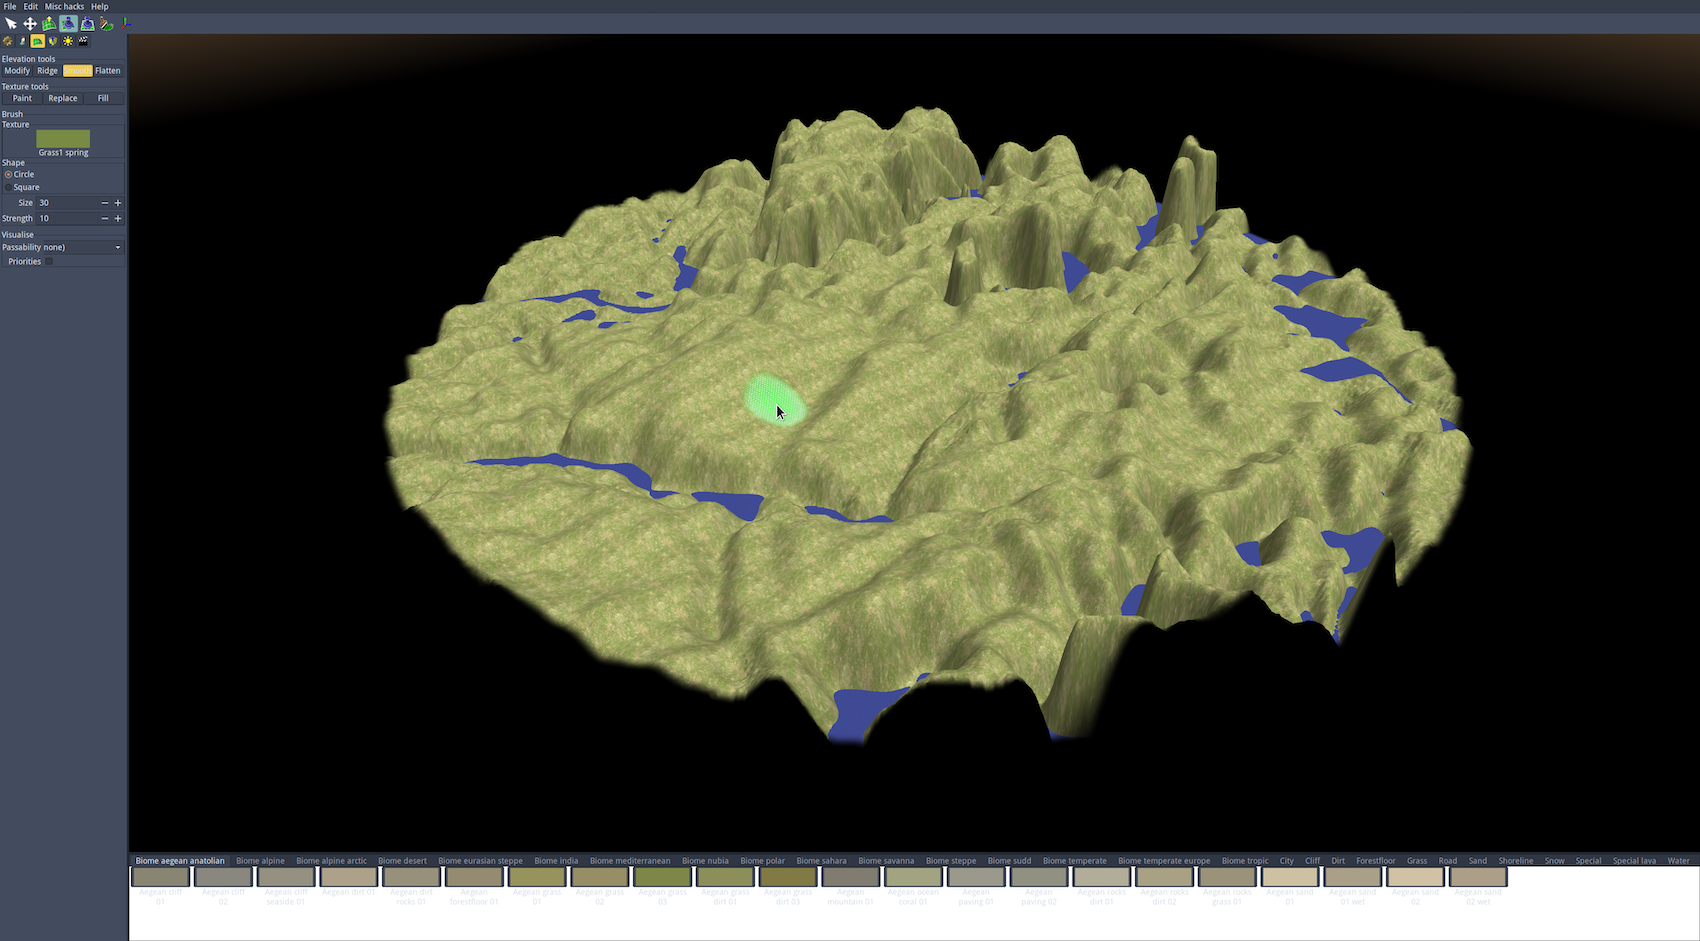
Figure 6. Saving a Scenario file in Atlas.
1. Choose a Scenario
The ideal historical scenario to recreate in 0 A.D. would be a battle between two or more civilizations that are available either in the base game or via a mod, which took place in a location with sufficient geological diversity for intriguing gameplay. If you are a classicist teaching a history class, then you could choose one of the critical battles from the Gallic Wars: late Republican Romans, Gauls and Britons are in the base game, while early Imperial Romans are available in the Delenda Est mod.
In this lesson, you will learn to make a simple recreation of the Battle of Bibracte, which took place about sixteen miles south of the actual historical Bibracte hilltop Gallic fort, now known as Mont Beuvray.7 Beuvray is in a strip of hillcountry with hundreds of meters of elevational changes, and the surrounding area contains rich forests, open fields, and both rivers and streams. Julius Caesar’s victory at Bibracte was crucial to his eventual triumph over Gaul.
2. Find a Topographic Map
There are many online topography databases to choose from, but topographic-map.com is well suited for your use case because it exclusively makes use of open access data, possesses detailed topographies of (nearly) everywhere around the globe, and presents topographies in a color-coded format that is easy to modify for importation into Atlas.
Use the master search tool to find a topography to import, then select a (roughly) square area around the region that you require – with a bit of extra space on all sides to spare – using your operating system’s screenshot or snipping tool. In order to have room for adjustments, aim for roughly 1024x1024 pixels (or a more-or-less square shape between, say, 512x512 and 2048x2048).
To feature the diverse landscape of the region surrounding Mont Beuvray, and to capture that the combat in the Battle of Bibracte actually took place some 25 kilometers south of the key Gallic ‘oppidum’ (fortified settlement), I purposefully took a screenshot that includes a larger area:
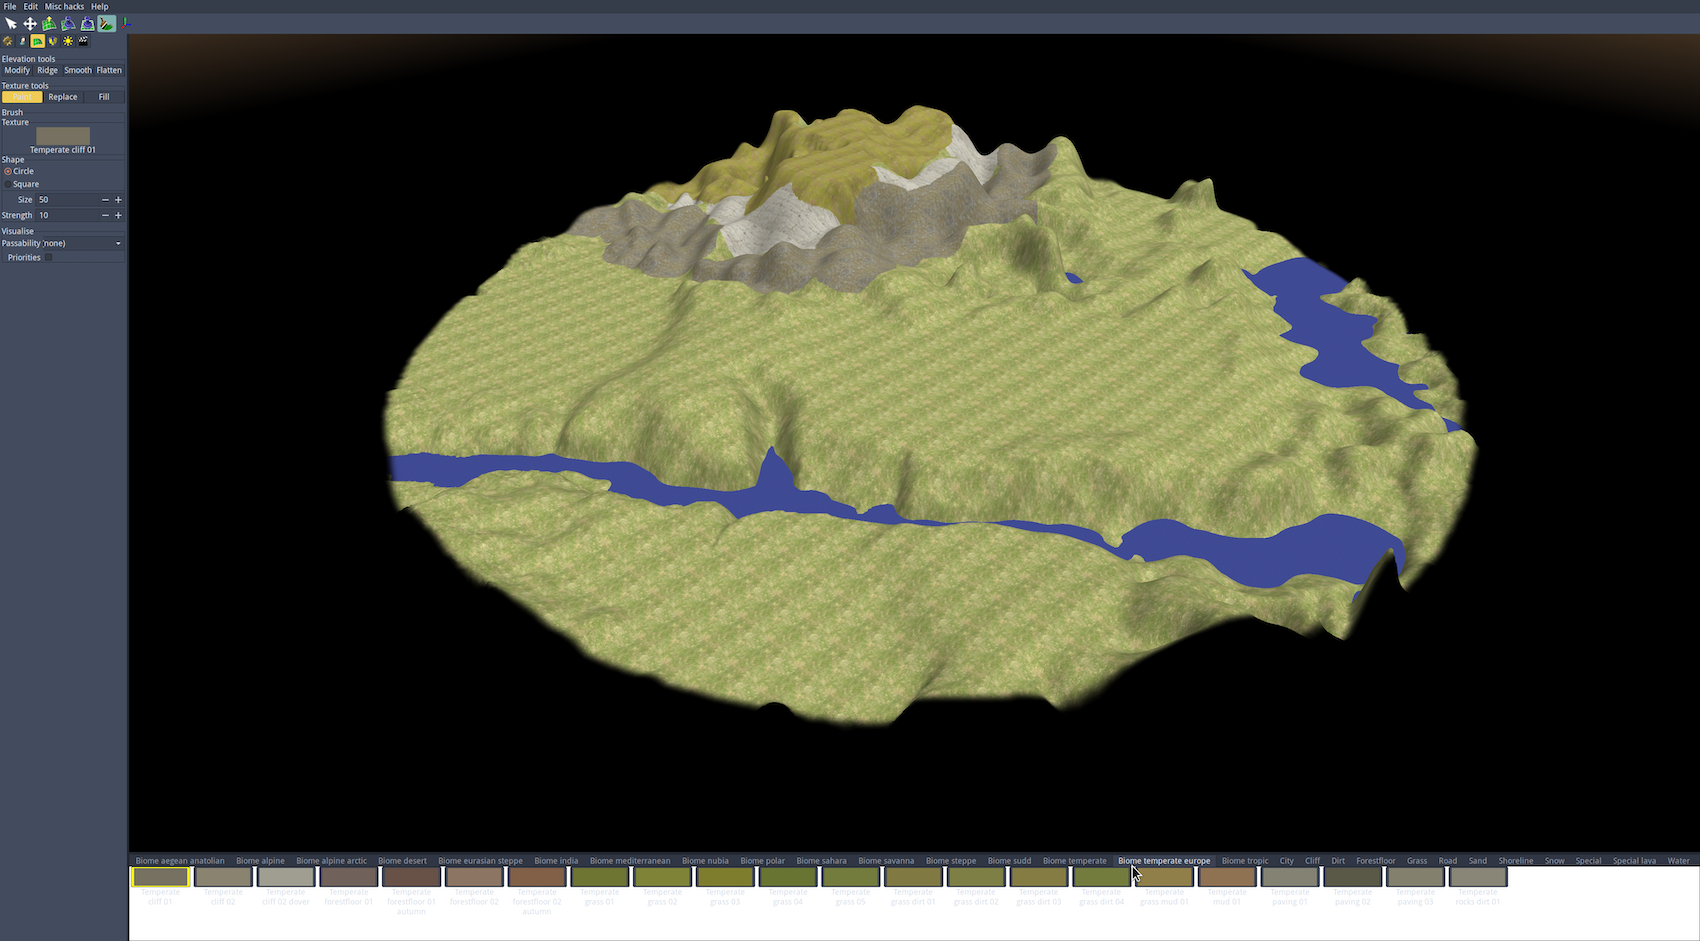
Figure 7. Selecting Mont Beuvray from topographic-map.com.
3. Modify the Topographic Map Image
Per the Heightmap Import section of the Atlas Manual, the final image must be a perfectly square, grayscale PNG. The brightness of a particular section determines its elevation, with relative darkness corresponding to lower elevation and relative lightness corresponding to higher elevation.
The hightmap importer in Atlas will take the image file as-is, so it is important to modify the image to be as close to ideal for Atlas as possible prior to importing. Your objective is to minimize the amount of tuning that you will need to do after the import using Atlas’s terrain tools.
Each of the following dimensions corresponds to an in-game terrain size that is explained in more detail (here) in the source code: 128x128 (Tiny), 192x192 (Small), 256x256 (Normal), 320x320 (Medium), 384x384 (Large), 448x448 (Very Large), and 512x512 (Giant). The Large (384x384) and Very Large (448x448) sizes are ideal for full 8-player matches, which probably makes them the best for most classroom situations (contrary to Giant, which requires loading so many resources that it can slow the game). Smaller sized terrains require (much) less work to make realistic.
Since we are purposefully recreating a large-scale battle that saw tens of thousands of warring men on a geographically diverse parcel of land, let’s choose a 512x512 pixel square to be imported as a Giant terrain in Atlas. The final version of the terrain in-game will be a perfect circle fitting just inside your square (i.e. with a diameter of 512 pixels). The space just inside the perimeter of that circle will not be usable in-game.
I recommend this simple workflow in GIMP to specify the image size and convert the image to grayscale, as it is likely to remain viable through future software updates:8
- In the top bar menu, click File > New, type in the square value of your choosing (here: width = 512 px and height = 512 px), then click OK.
- Click File > Open as Layer and select your unedited topographic map image.
- Click Layer > Scale, and, leaving the proportions locked (the chain icon connected), type your desired width or height value (my width is 911 px and height is 814 px, so I type ‘512’ in Height, setting the Width to 573 automatically) and click Scale.
- With Windows > Toolbox open, click the four-way icon (or tap ‘M’ on your keyboard) to select the Move tool, then shift the layer to position the relevant geographic details where you need them in the final circular in-game terrain. Then, click Layer > Layer to Image Size to remove everything outside the correct image dimensions from the layer.
- Click Select > None, then Image > Mode > Grayscale.
- Finally, click File > Save a copy to save a version of the image file upon which you can fallback at any time.
At this point, you have a correctly sized grayscale image that you theoretically could export in .png format for Atlas, but it probably has harsh edges and stark contrasts that would yield unrealistically sharp rises and falls of elevation, and thus an unplayable a terrain. Plus, if your topographic data shows areas with higher elevation in darker shades rather than lighter when converted to grayscale (this happens with images from topographic-map.com), then it will be imported with elevational changes that are the opposite of what they should be.
First, regardless of your specific terrain choice, you will need to smooth the image’s internal rough edges by introducing blur. In GIMP, do the following:
- Click Filters > Blur > Gaussian Blur.
- Set the Size X and Size Y values to between 2.00 and 6.00, probably about 3.50 to start. The image should be distorted enough that it lacks any rigid edges, but not so distorted that its features are unrecognizable. Favor distortion over clarity.
Second, if the elevated terrain in your topographic map image appears darker rather than lighter, you should rectify the issue by inverting the colors. Here is one way to achieve this in GIMP:
- Click Select > By Color, and click on the relevant color to invert. You might need to click multiple times: GIMP compounds the selection automatically. (GIMP also allows you to undo individual steps within compounded selections with
CTRL + zor Edit > Undo.) - Click Colors > Brightness-Contrast, and increase both values until the terrain that should be lighter (elevated) is in fact lighter.
- In my specific image, this results in steep dark spots on the edges of the mountainous terrain. If this happens, you can blur their edges manually with the Smudge tool (click the pointing finger in the Toolbox, or type ‘S’ on your keyboard). It also helps to add just a few drops of white paint (using the Paint tool, which is available by clicking the paintbrush icon in the Toolbox or tapping “P” on my keyboard) to the area in the north with especially higher peaks, including Mont Beuvray itself.
Below is the final version of the image in GIMP after following all of these steps. Click File > Export, and type beauvray.png before unselecting all .png filetype export options (to make a simple file). Choose 16bpc GRAYA for 16-bit grayscale with alpha, and turn off compression (set the value to 0) to ensure the highest quality export possible.

Figure 8. Mont Beuvray ready for import after editing in GIMP.
After clicking Export, you are ready for the next step: actually importing the heightmap into Atlas.
4. Import the Topographic Map Image into Atlas
Now that you have chosen a historical scenario to recreate, found a topographic map to import, and edited the topographic map image, importing your topography into Atlas will be easy.
First, open 0 A.D. From the main menu, click Scenario Editor to launch Atlas. When asked ‘Would you like to quit 0 A.D. and open the Scenario Editor?’, click Yes.
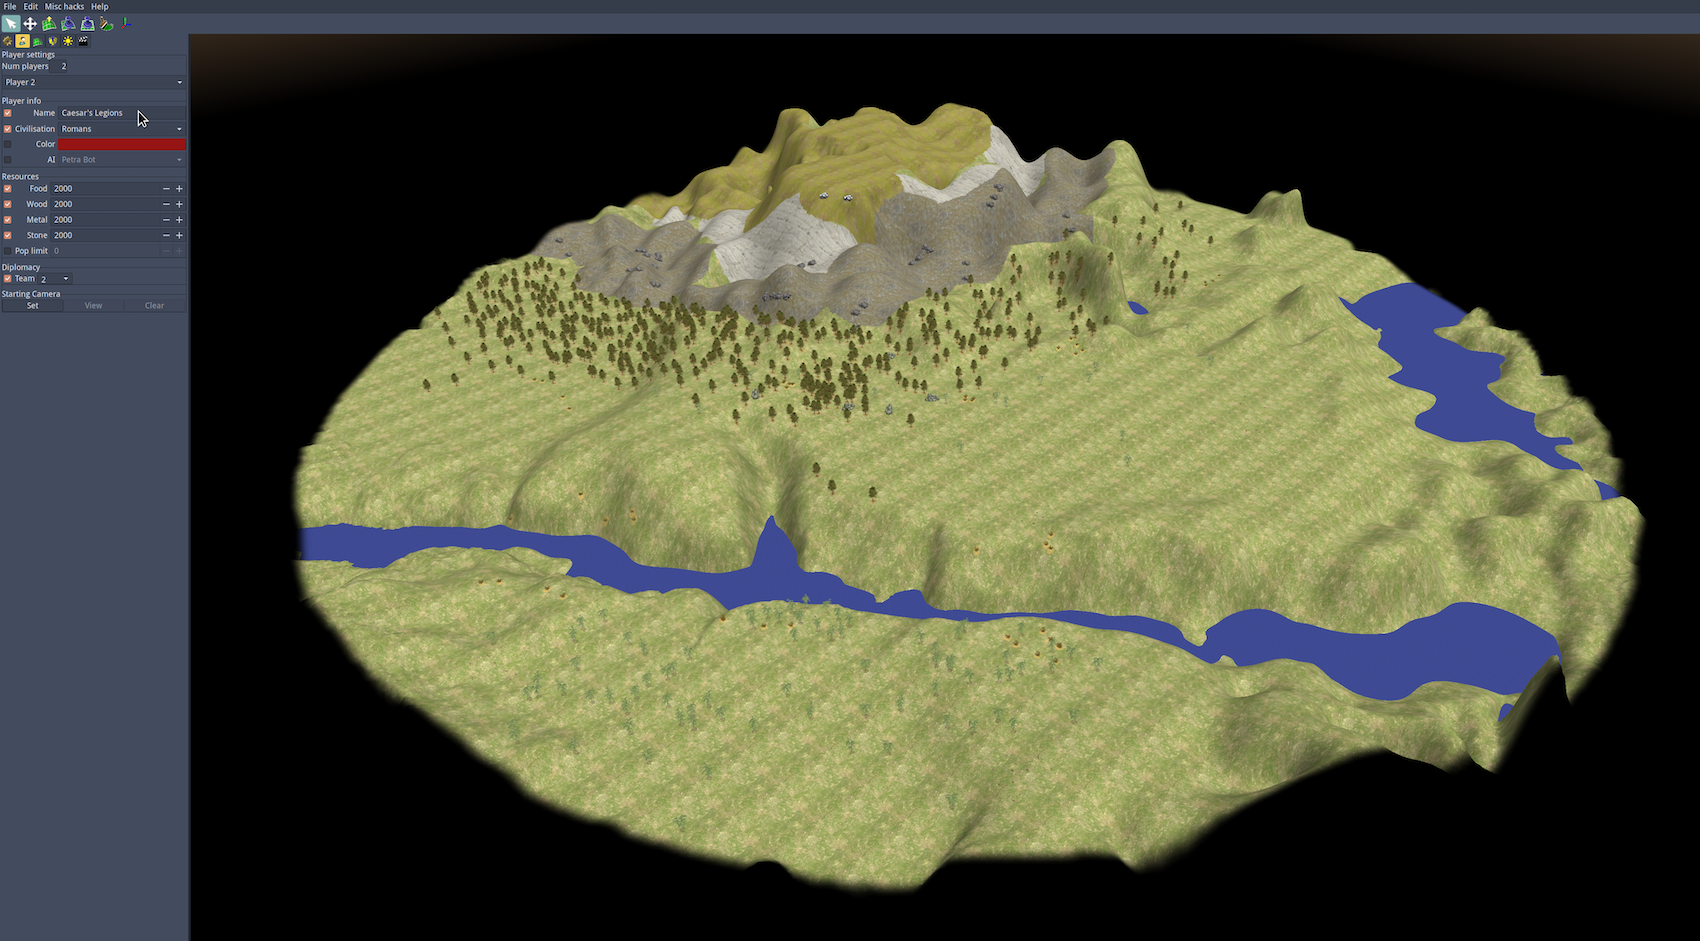
Figure 9. Opening Atlas, the Scenario Editor.
In Atlas, click File > Open Heightmap, and select the file that you have edited.
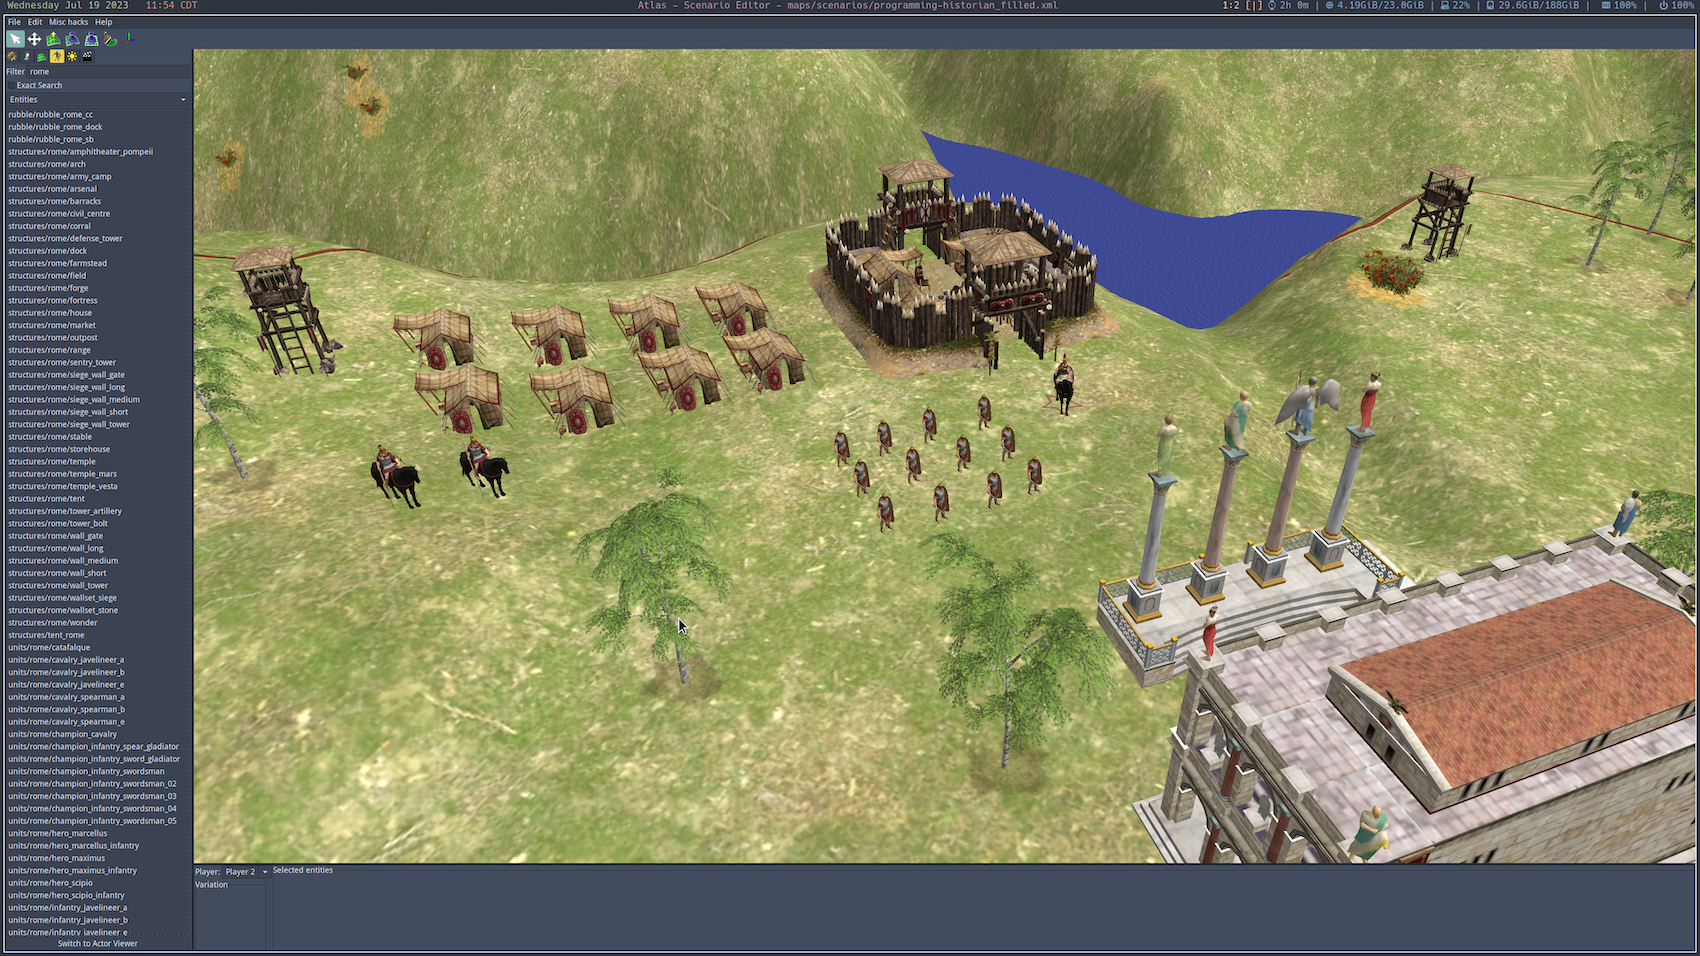
Figure 10. Importing a heightmap file inside Atlas.
If you’ve followed the Mount Beuvray example, here is how it would look:
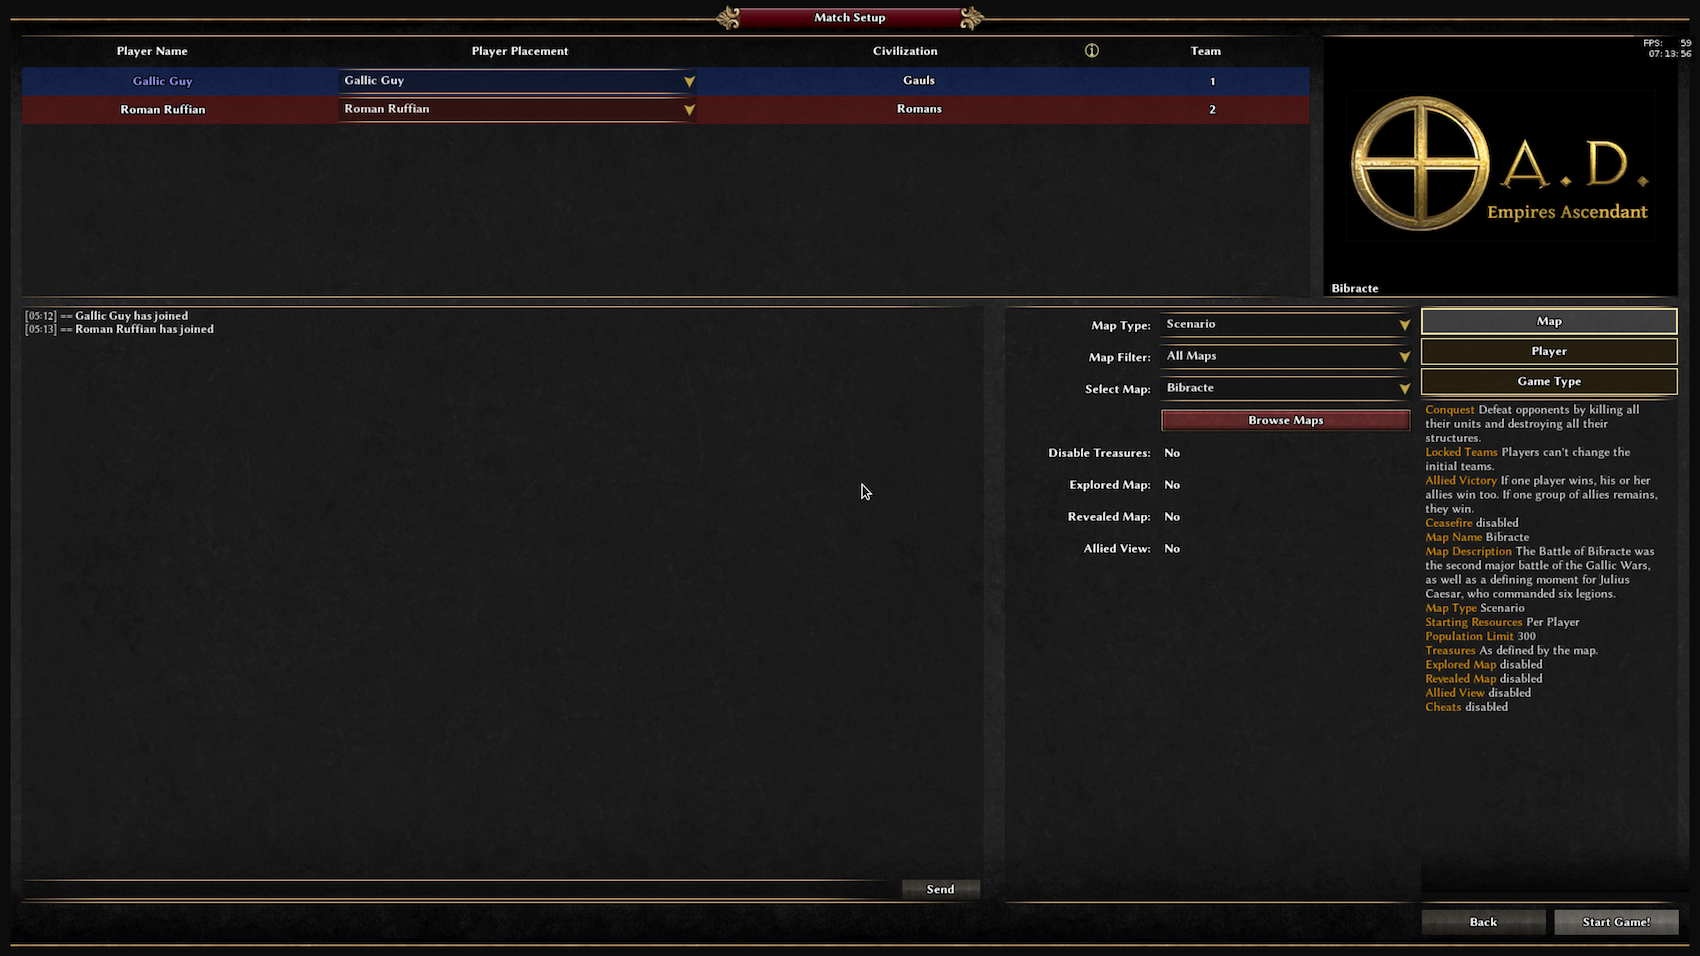
Figure 11. Topographic map of Mont Beuvray, initially imported into Atlas.
The source image could have used a bit more blurring to reduce the harshness (the flat areas ought to be flatter, and the mountains ought to have more gradual slopes), as well as more contrast to bring the mountains to a noticeably higher altitude than the surrounding flatlands. After quickly reopening the saved backup image and making both of those changes in GIMP (per step 3), this is the result:
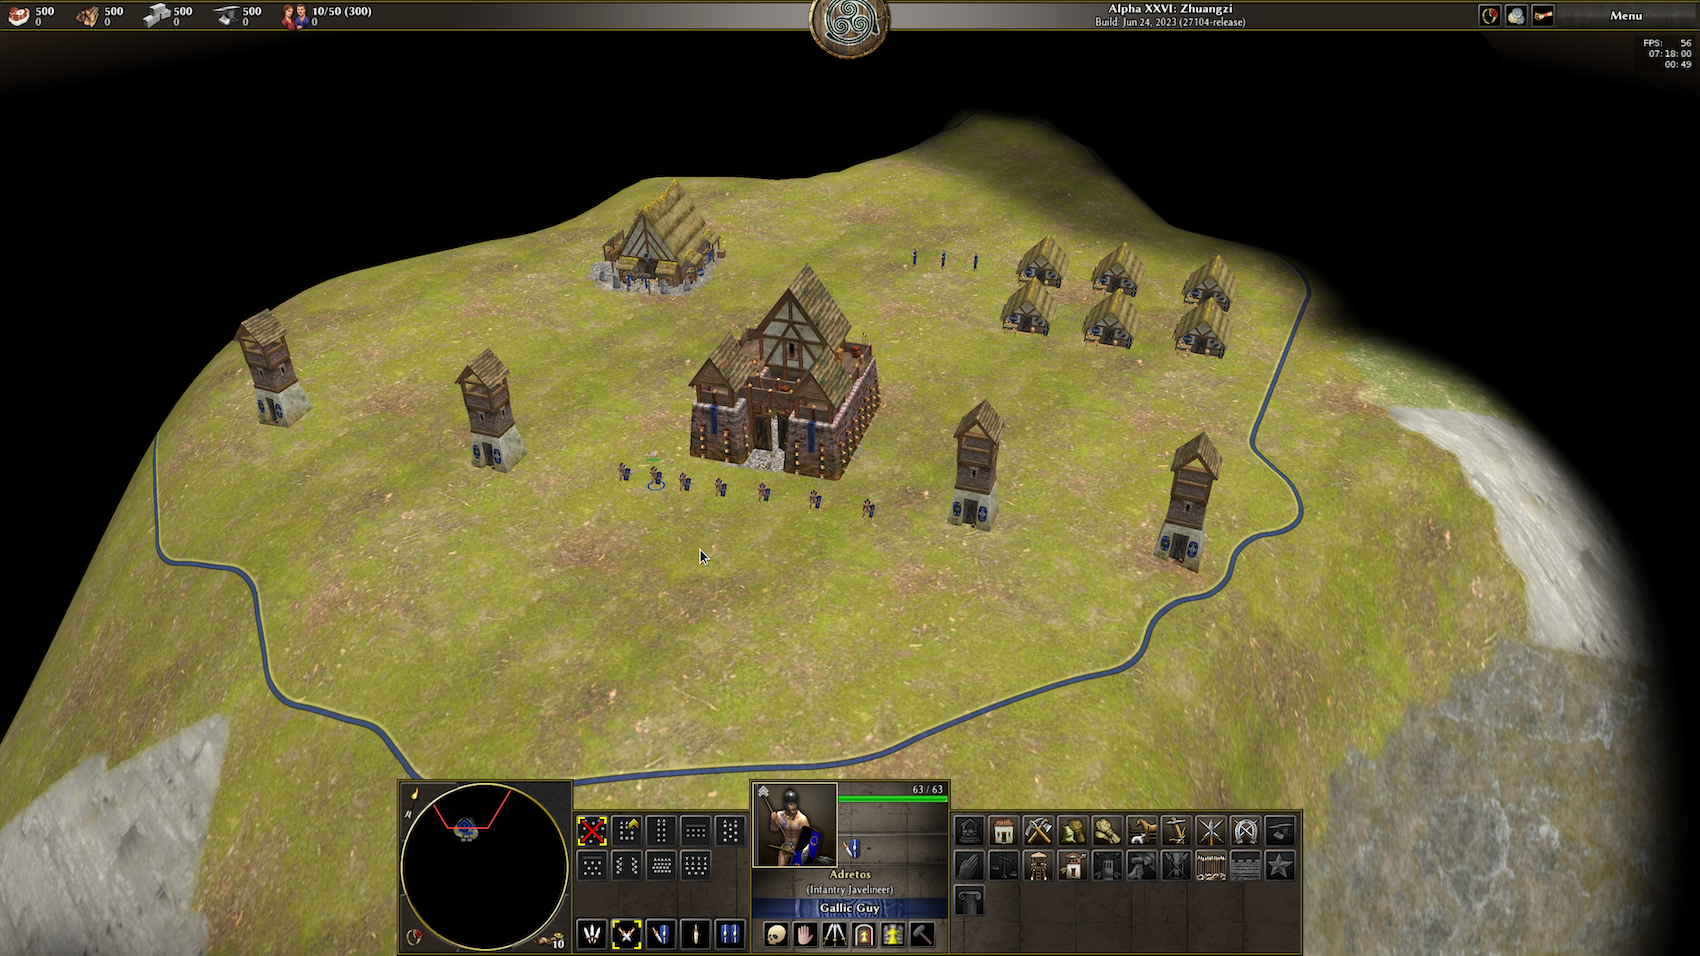
Figure 12. Topographic map of Mont Beuvray, edited after initial import into Atlas and then re-imported.
5. Add, Adjust, and Smooth the Terrain’s Features
Before doing anything else to your terrain in Atlas, you should add water, perform a general landscape smoothing, and adjust its other core (elevational) features. These three tasks lay the foundation for everything else that you will place in your gameplay scenario.
For water, from the main menu, click the sun-shaped icon for Environment settings. Then, drag the Water height slider until there is a reasonable amount of water in the terrain’s points of low elevation.
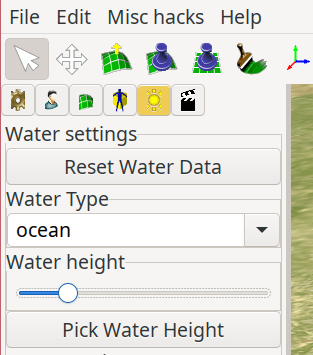
Figure 13. Adjusting the water height to add water to the terrain.
To smooth the terrain, click the plain green icon for Terrain settings. Then, click Smooth, and adjust the size of the tool to about 20, leaving the strength at about 10, and work around the map as needed by left-clicking and dragging the cursor on the areas needing correction.
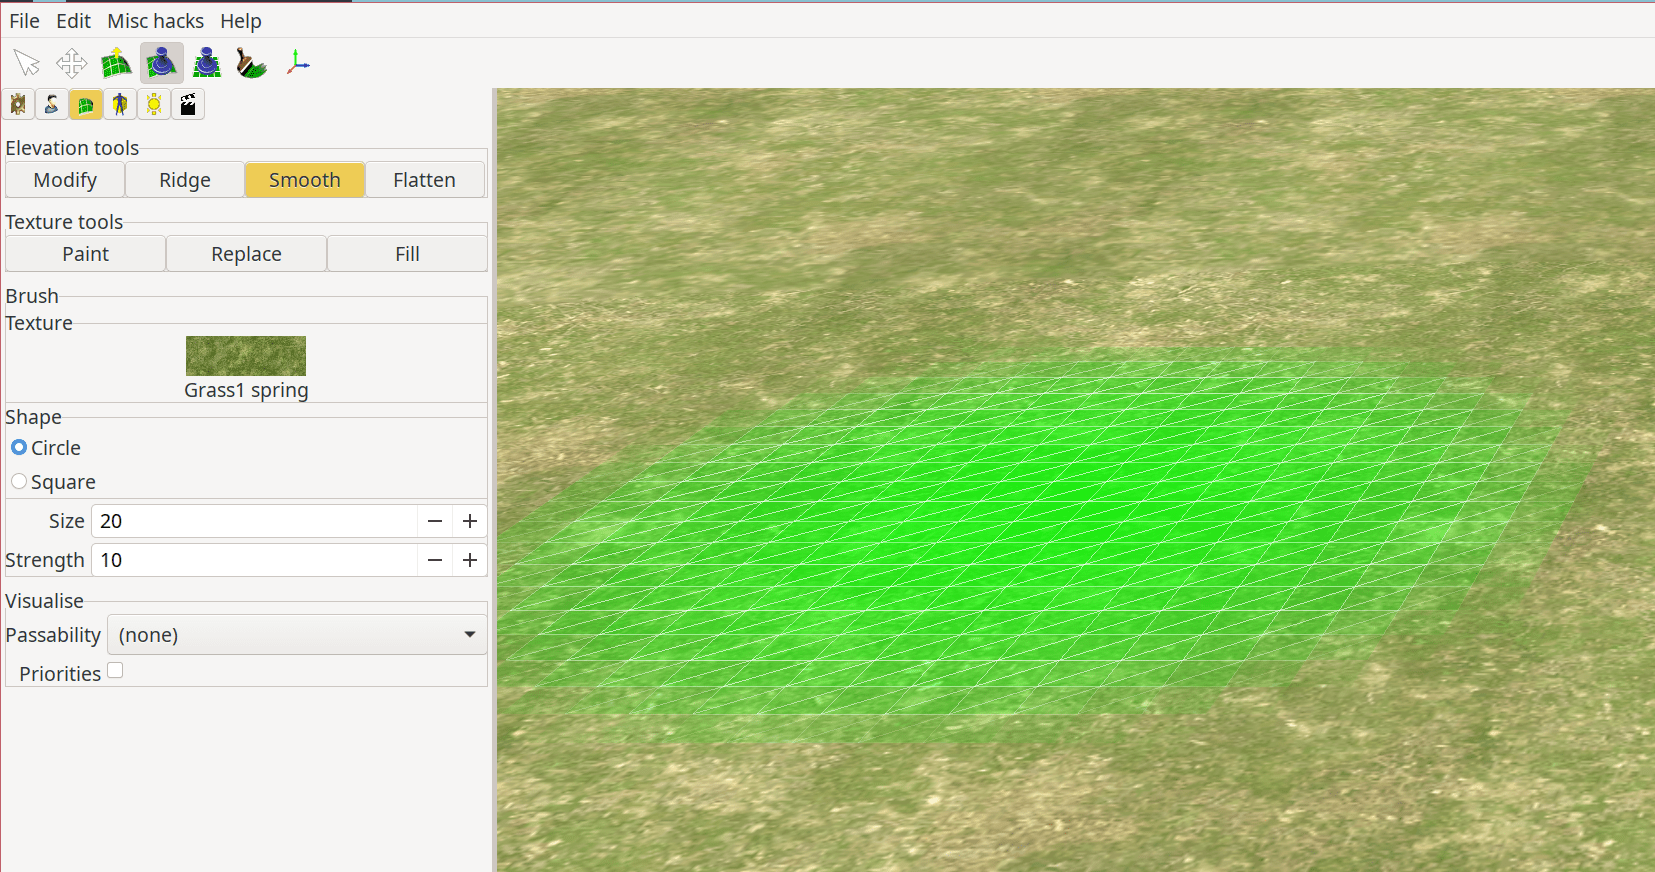
Figure 14. Smoothing the terrain.
Here is the terrain after adding water and performing an initial smoothing:
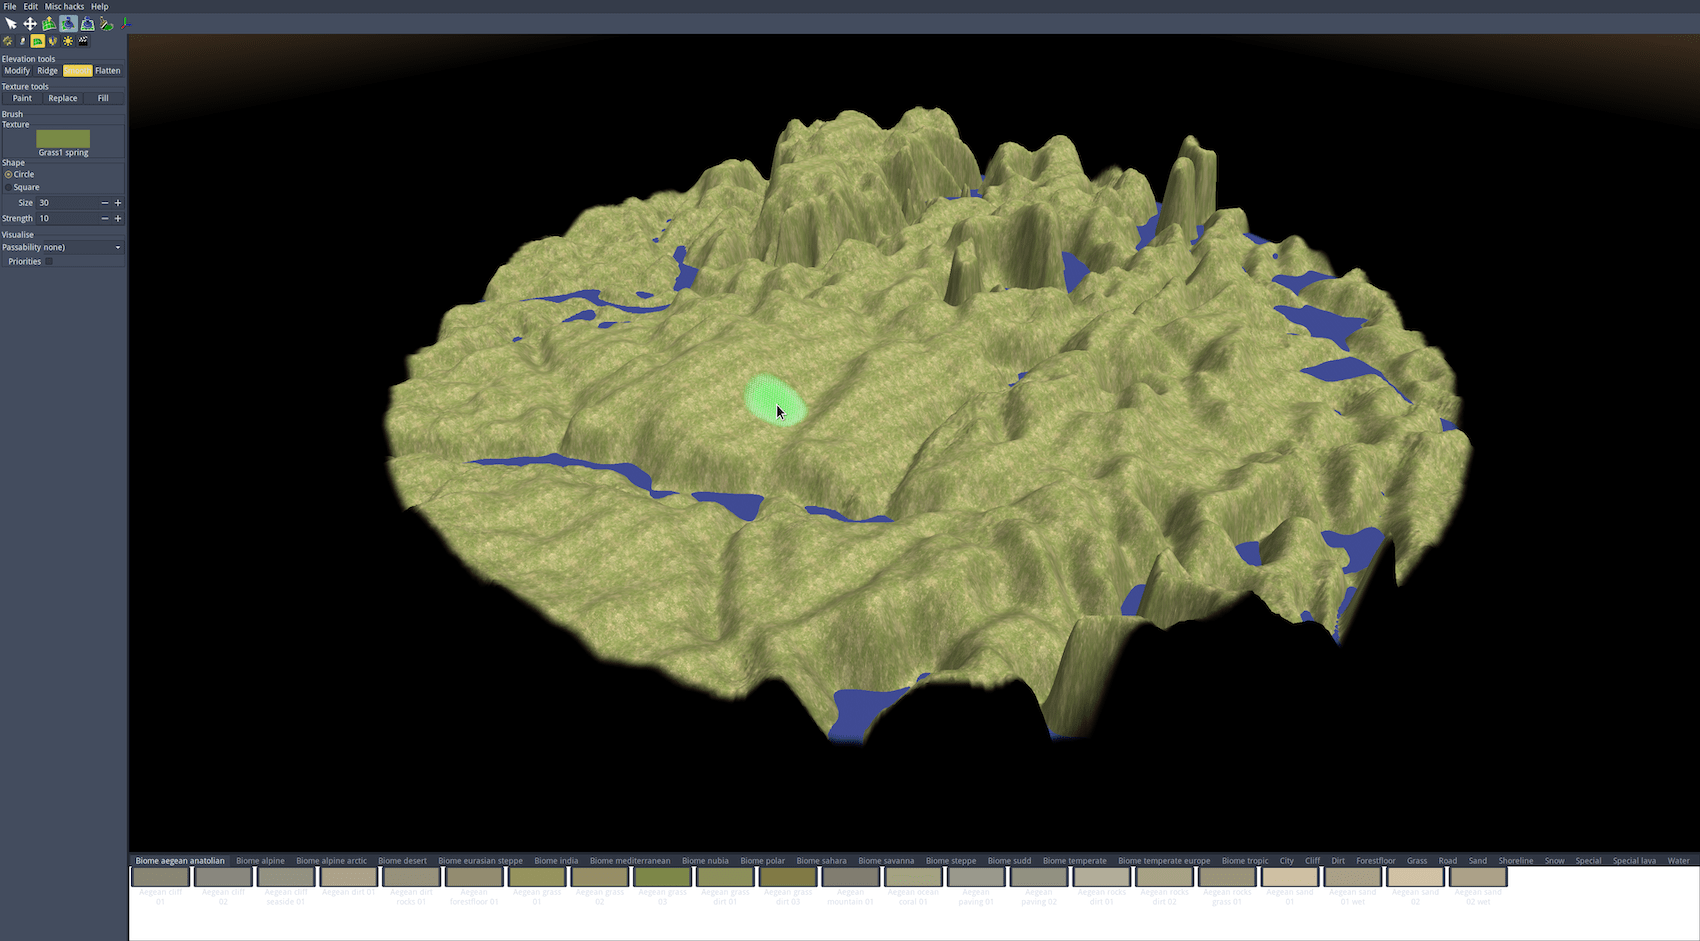
Figure 15. Mont Beuvray in Atlas with water added and terrain smoothed.
The other adjustments you will need to perform at this stage will depend upon your terrain. I recommend you experiment with the different terrain tools, keeping the modifier sizes to a minimum (and backing up copies of the terrain) until you reach your desired result.
In this lesson’s sample, I used the Flatten, Modify, and Smooth terrain adjustment tools only for a few minutes. Also, I added a few rocky biomes (found in Atlas’ bottom task bar) to the northern mountains.
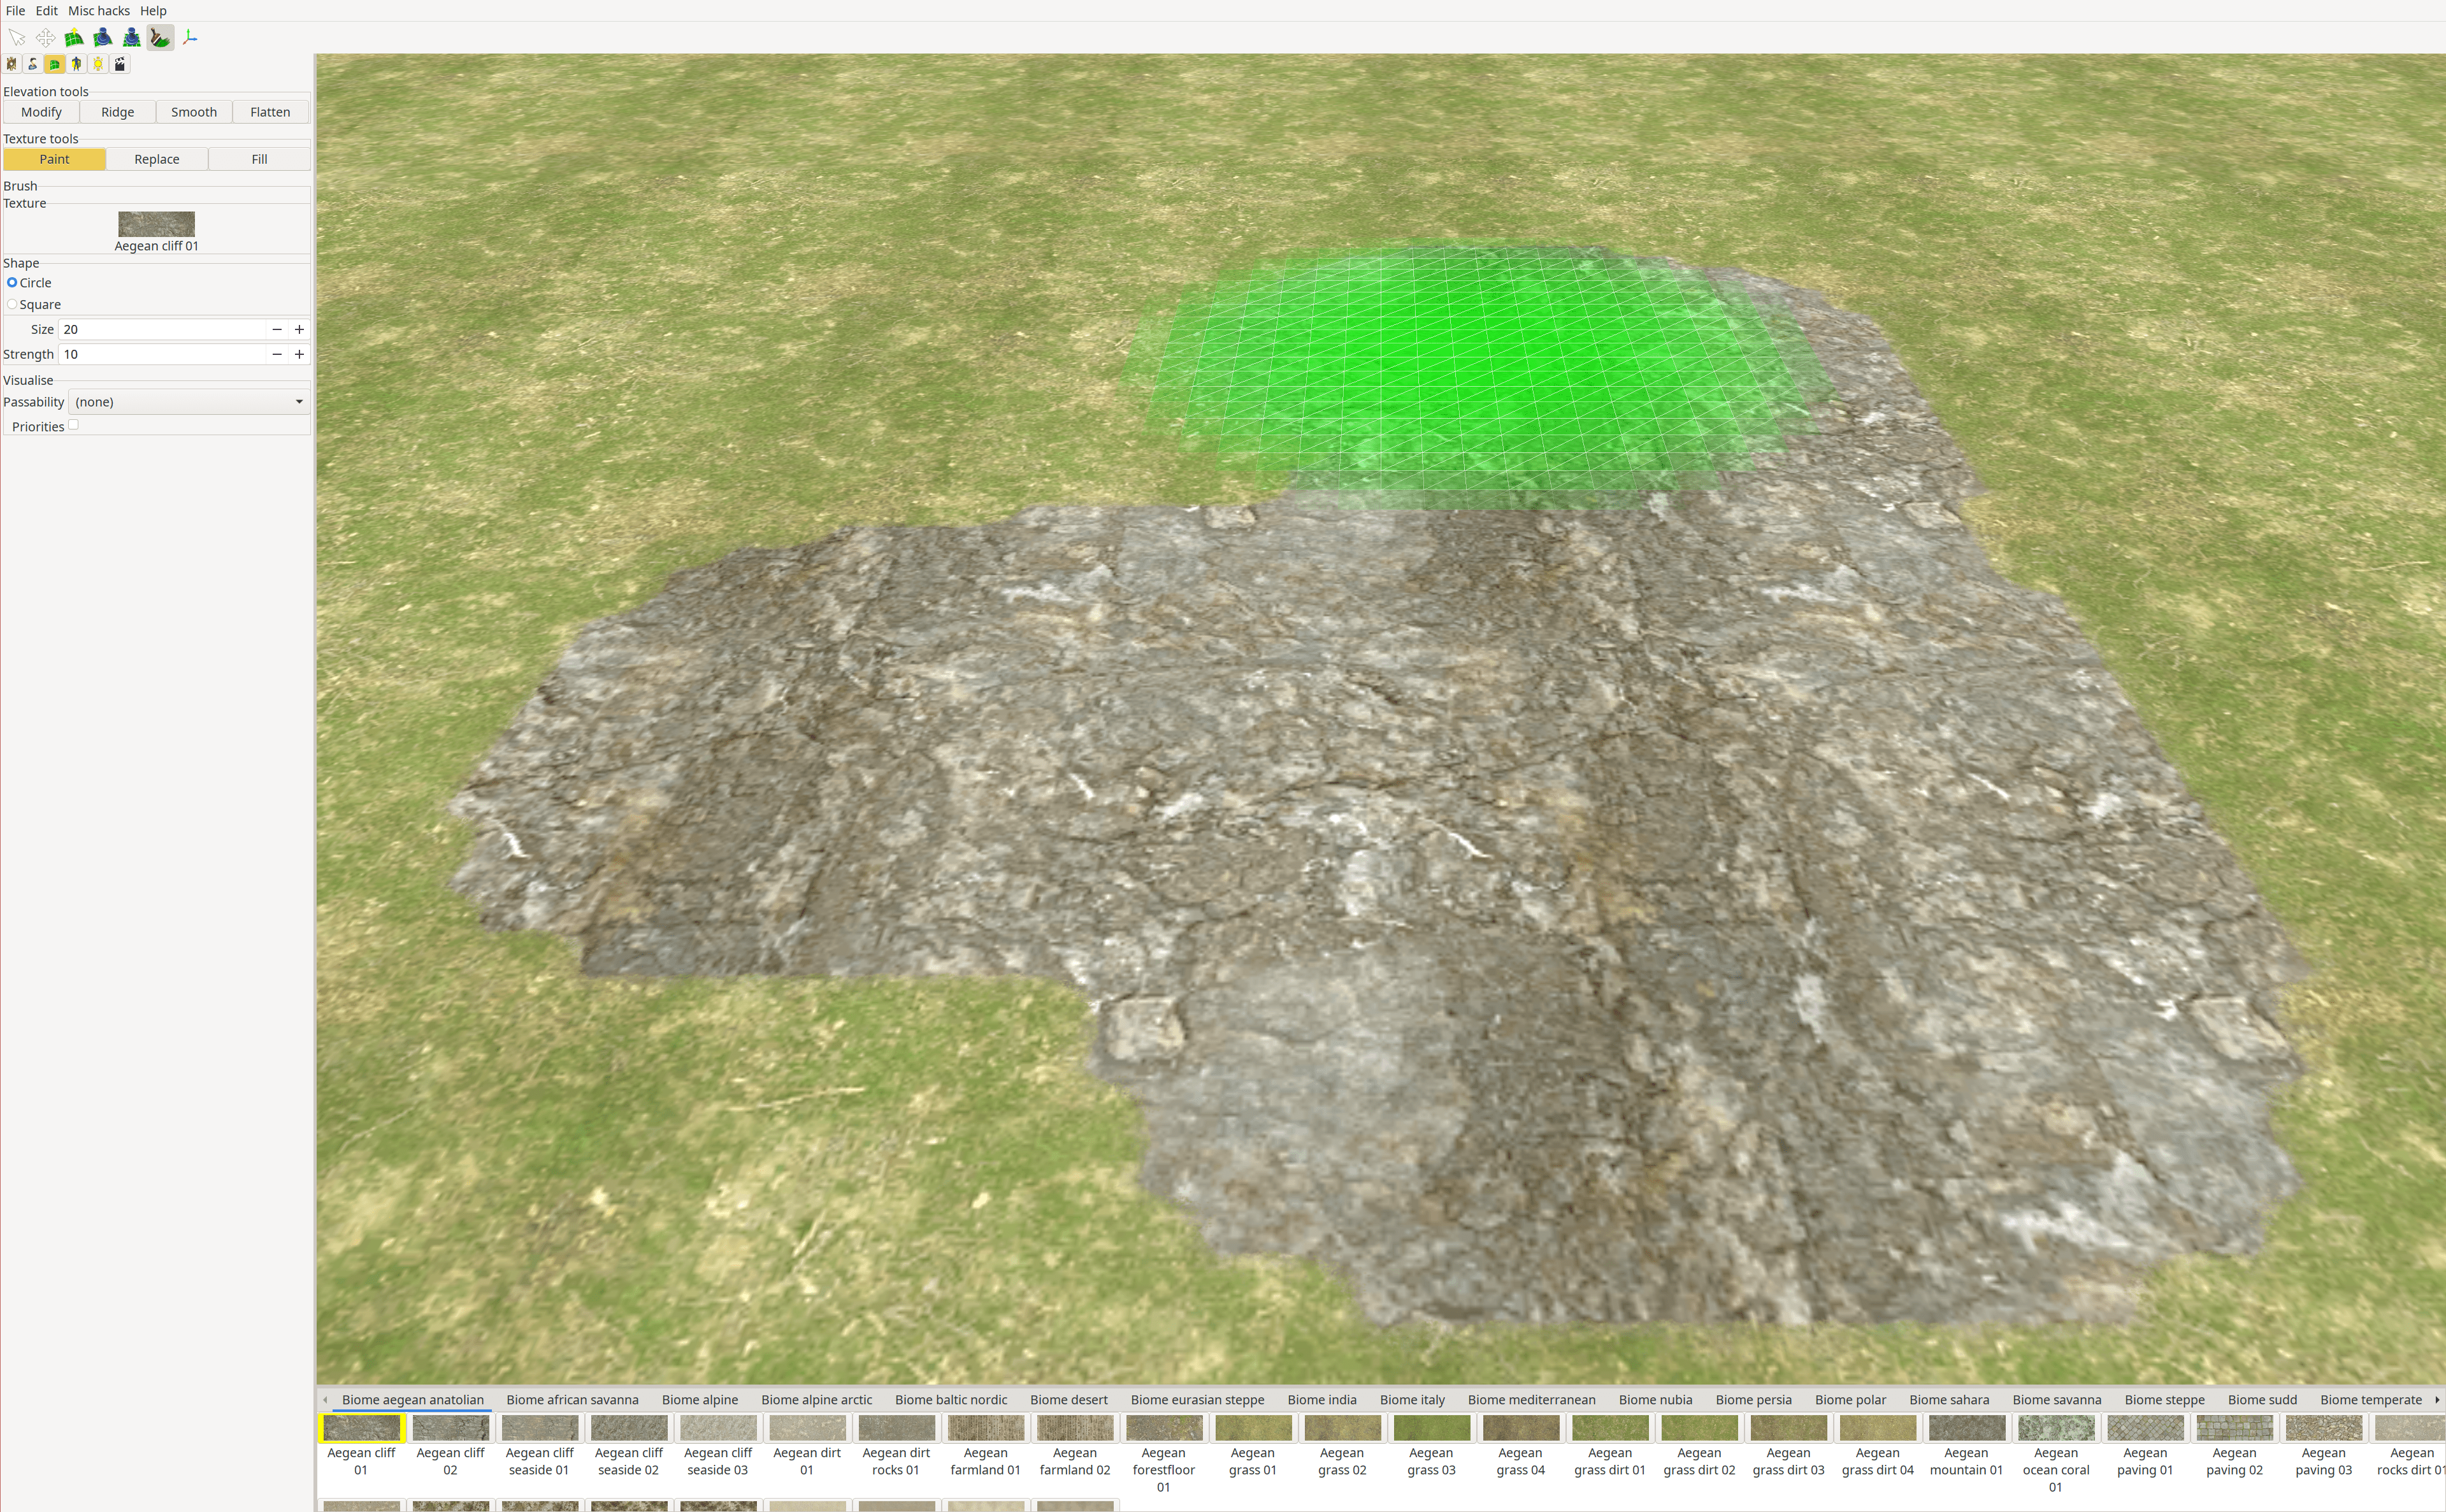
Figure 16. Incorporating new biomes into the terrain.
This is the result:
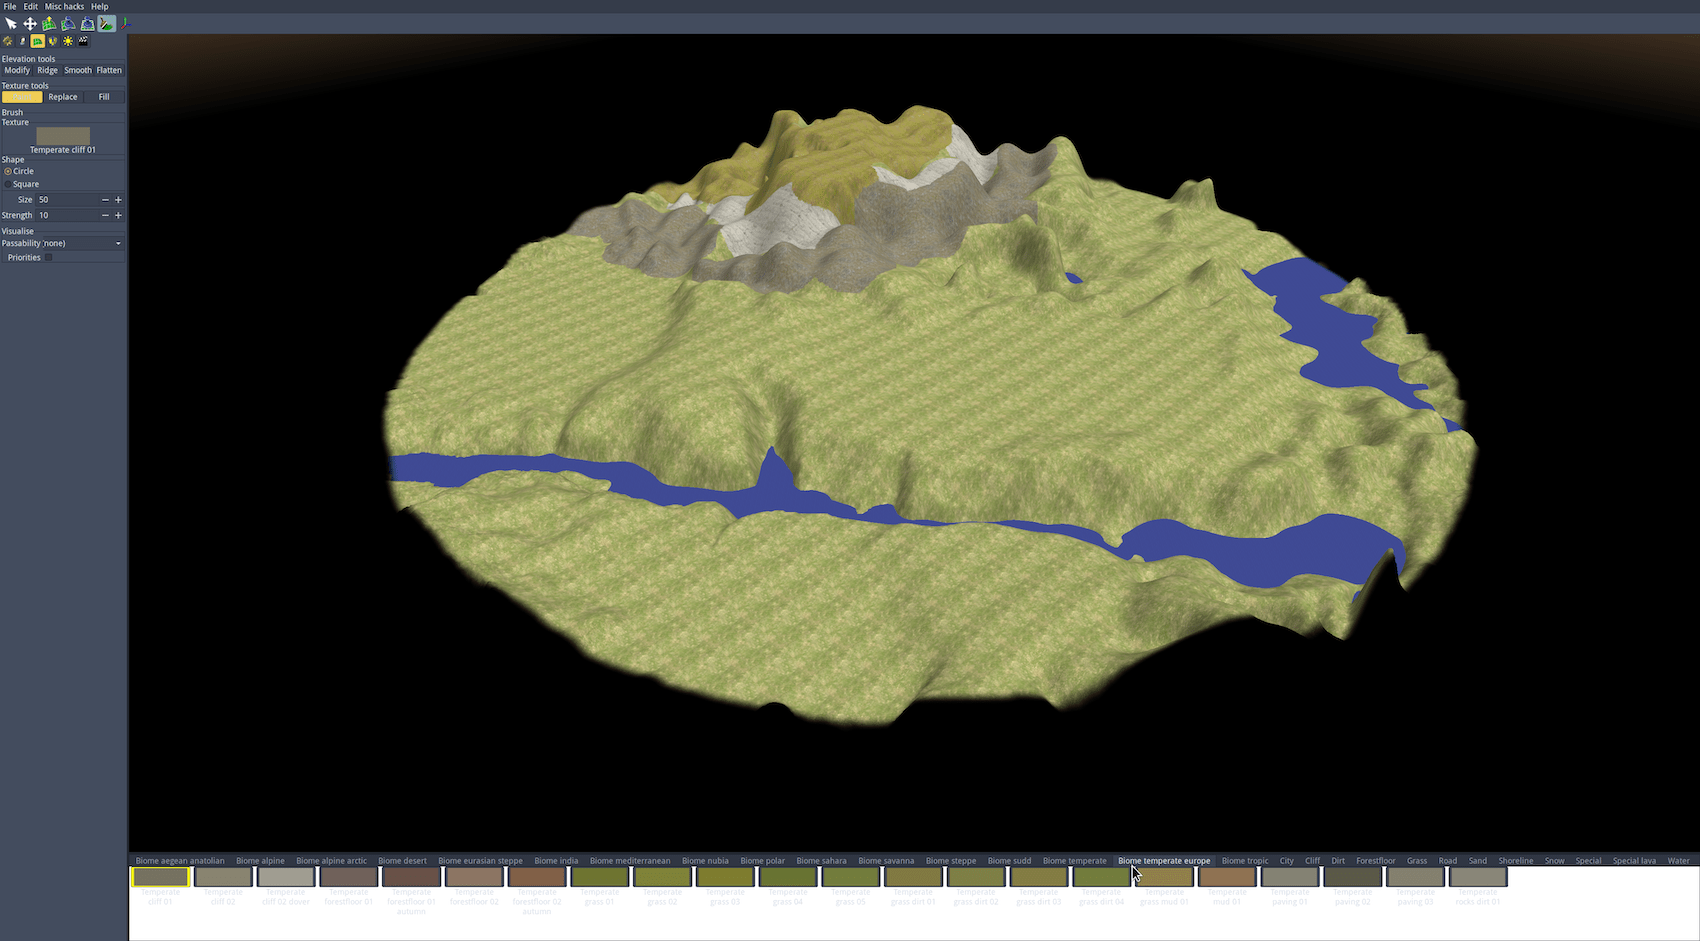
Figure 17. Mont Beuvray base terrain polished in Atlas.
6. Add Flora and Fauna to the Terrain
Now that your terrain’s core features are in place, it is time for you to add flora and fauna. Your objective should not be a pebble-for-pebble and bird-for-bird depiction of the real-world equivalent but, rather, to capture its overall character and, more importantly, to insert special features that matter in the historical scenario.
To place flora and fauna, use the Object tool with the person-shaped icon. Flora and fauna are categorized as units belonging to ‘Gaia’ (Mother Earth): to retrieve a full list of options, filter by ‘gaia’ (lowercase) in the top search bar. Let’s add deer and other wildlife native to the woodlands of central France.
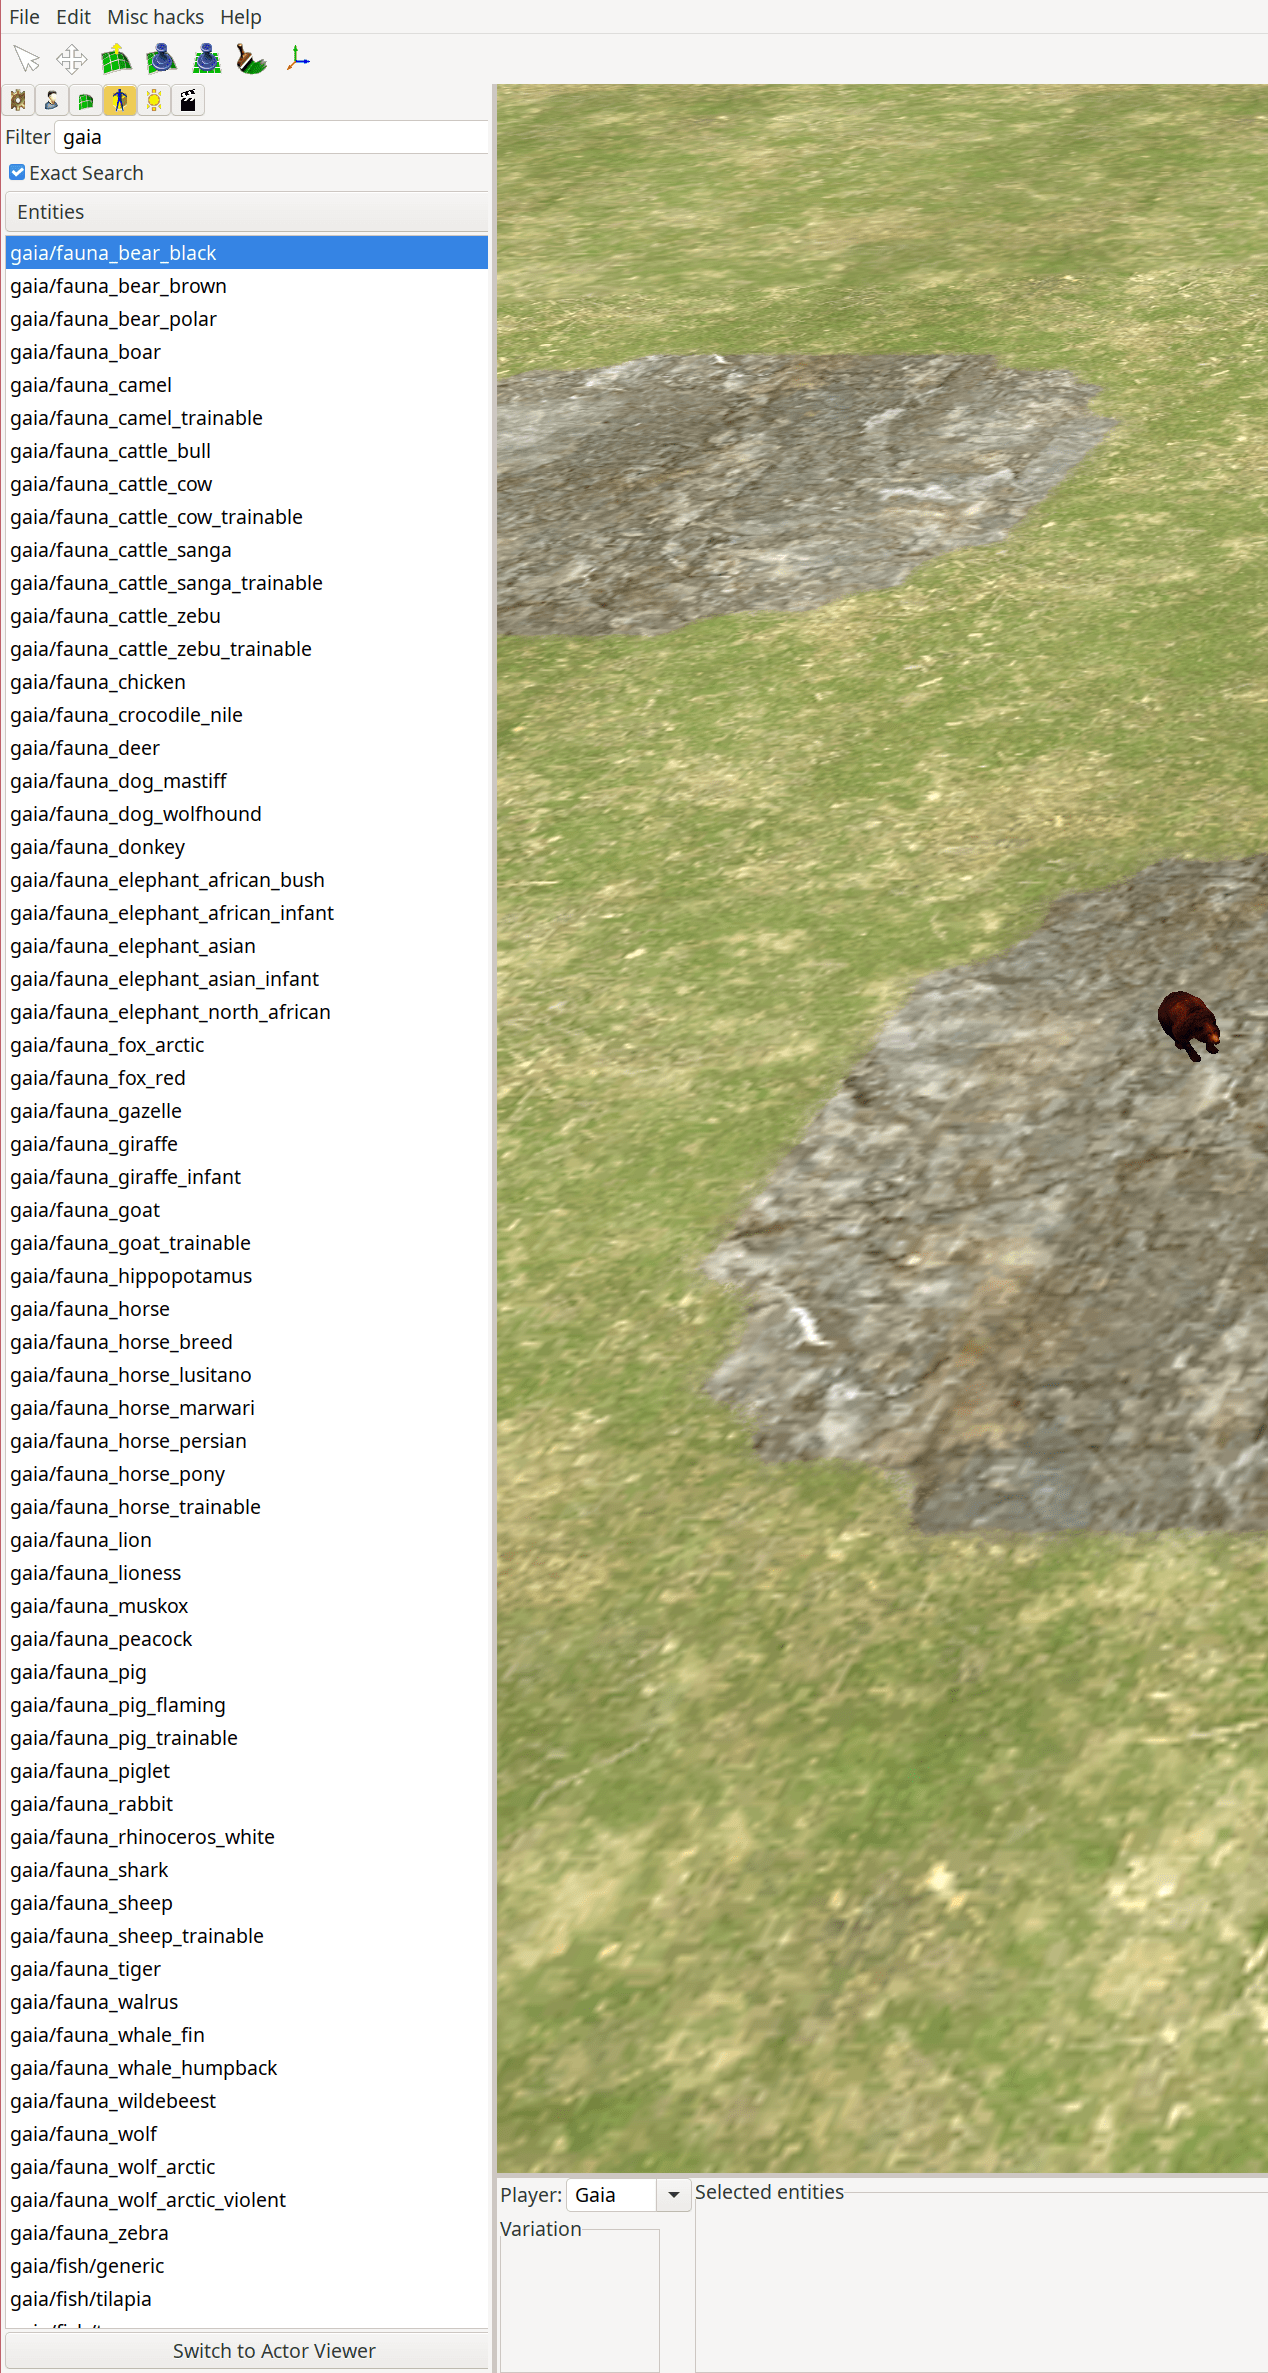
Figure 18. Using the Object tool to add flora and fauna to the terrain.
Mont Beuvray has a blend of deciduous and coniferous vegitation. Although the surrounding flatlands are all open fields today, they were probably forested in antiquity.
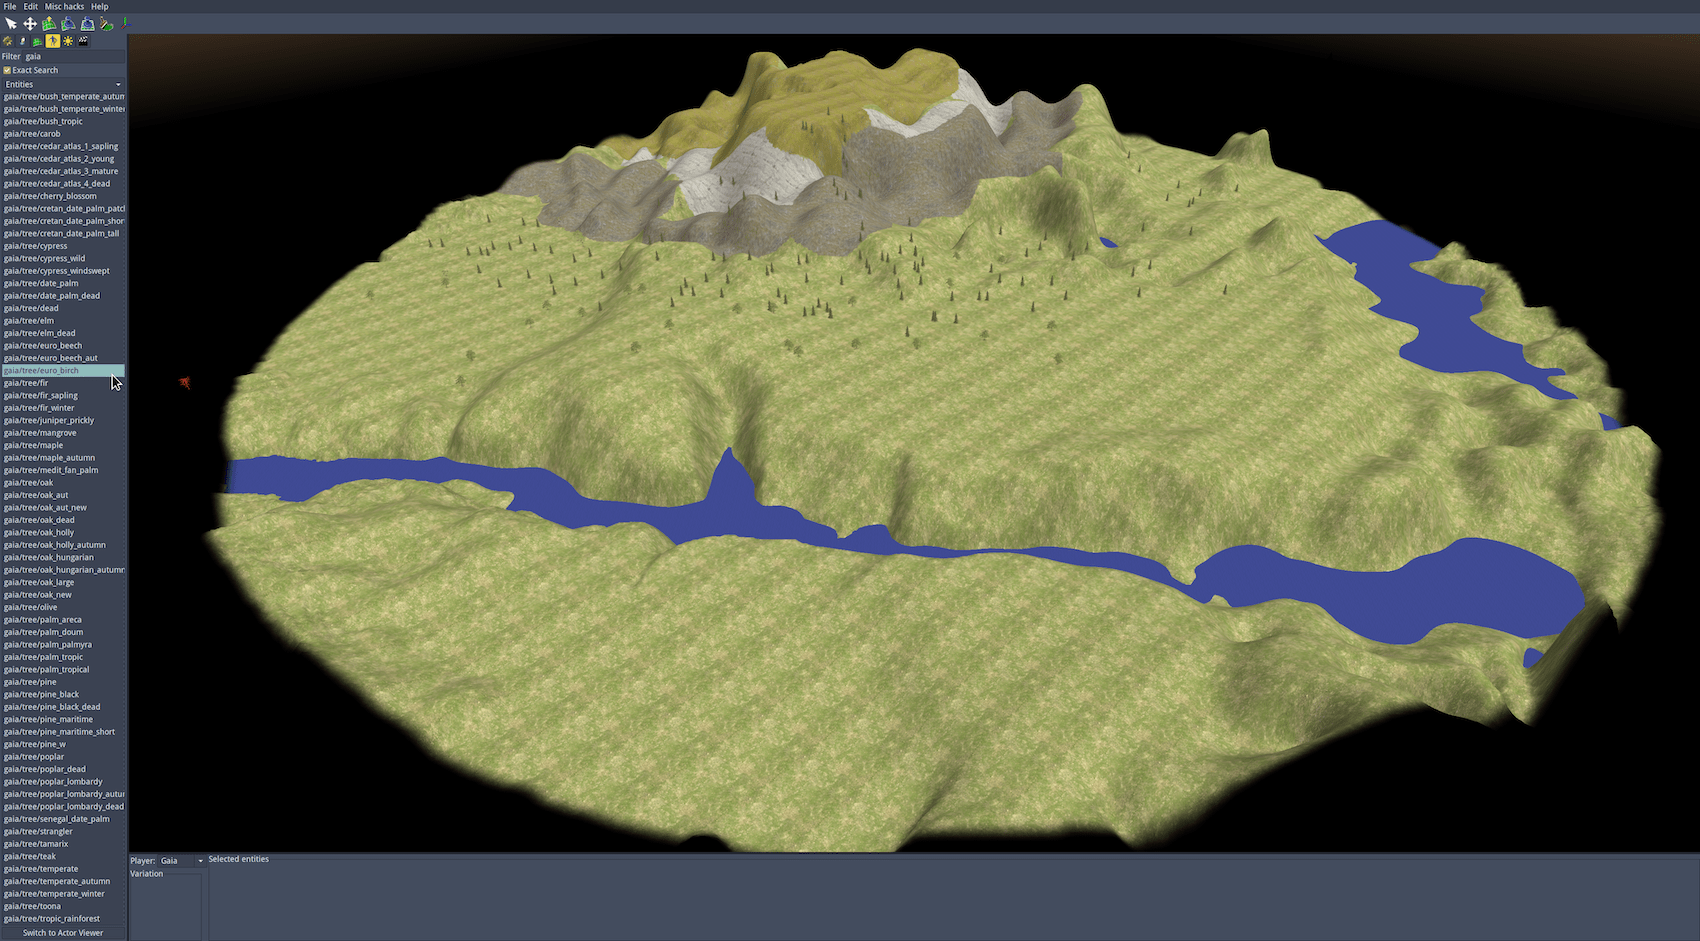
Figure 19. Adding trees in Atlas.
Finally, make sure to add a form of all four of the game’s resources – wood, stone, metal, and food – to your terrain, whether or not the real-world equivalent actually possesses all four of those resources. Without them, the scenario will not be playable. Wood is found under ‘gaia/tree/’, stone under ‘gaia/rock/’, and metal under ‘gaia/ore/’. For food, just add huntable animals, berry bushes, or fruit trees – you can browse through Gaia’s flora and fauna for options that make sense for your terrain.
7. Add Scenario-specific Features
Next, you need to add scenario-specific features to your terrain. These are the units, structures, and everything else that will make the historical scenario actually playable.
Most importantly, each civilization needs to start with either of the following:
- A ‘civic center’ (sorted by ‘civilization/civil’ in the Object tool) which defines the civilization’s starting territory and allows the creation of female citizens and basic citizen soldiers
- Sufficient resources to build a civic center (typically, as of Alpha 27, 500 Wood, 500 Stone, and 500 Metal – but you should check the requirements for each specific civilization inside a specific game version), as well as at least 1 unit capable of gathering and building
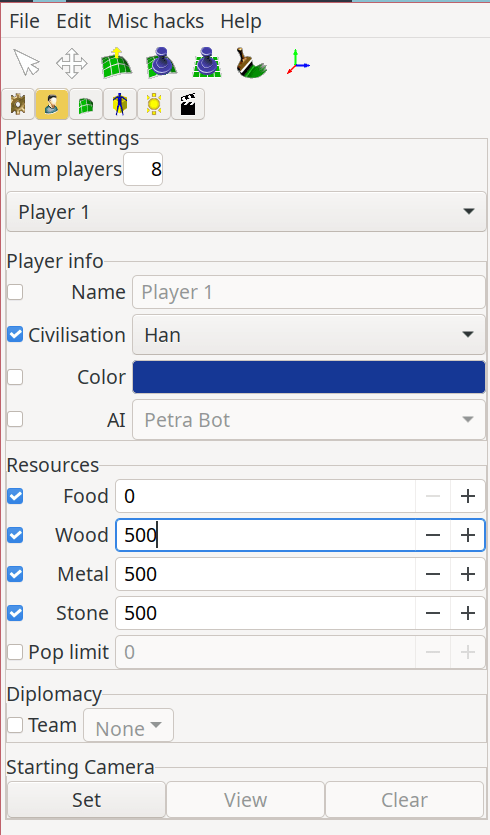
Figure 20. Creating a sample Player 1.
Customarily, each civilization starts with two or three female citizens to gather resources and build; two or three citizen soldiers to gather resources, build, and (if needed) early game military defense; and a cavalryman, who serves as a scout to explore undiscovered terrain. Each in-game unit actually represents tens, hundreds, or even thousands of real-world counterparts.
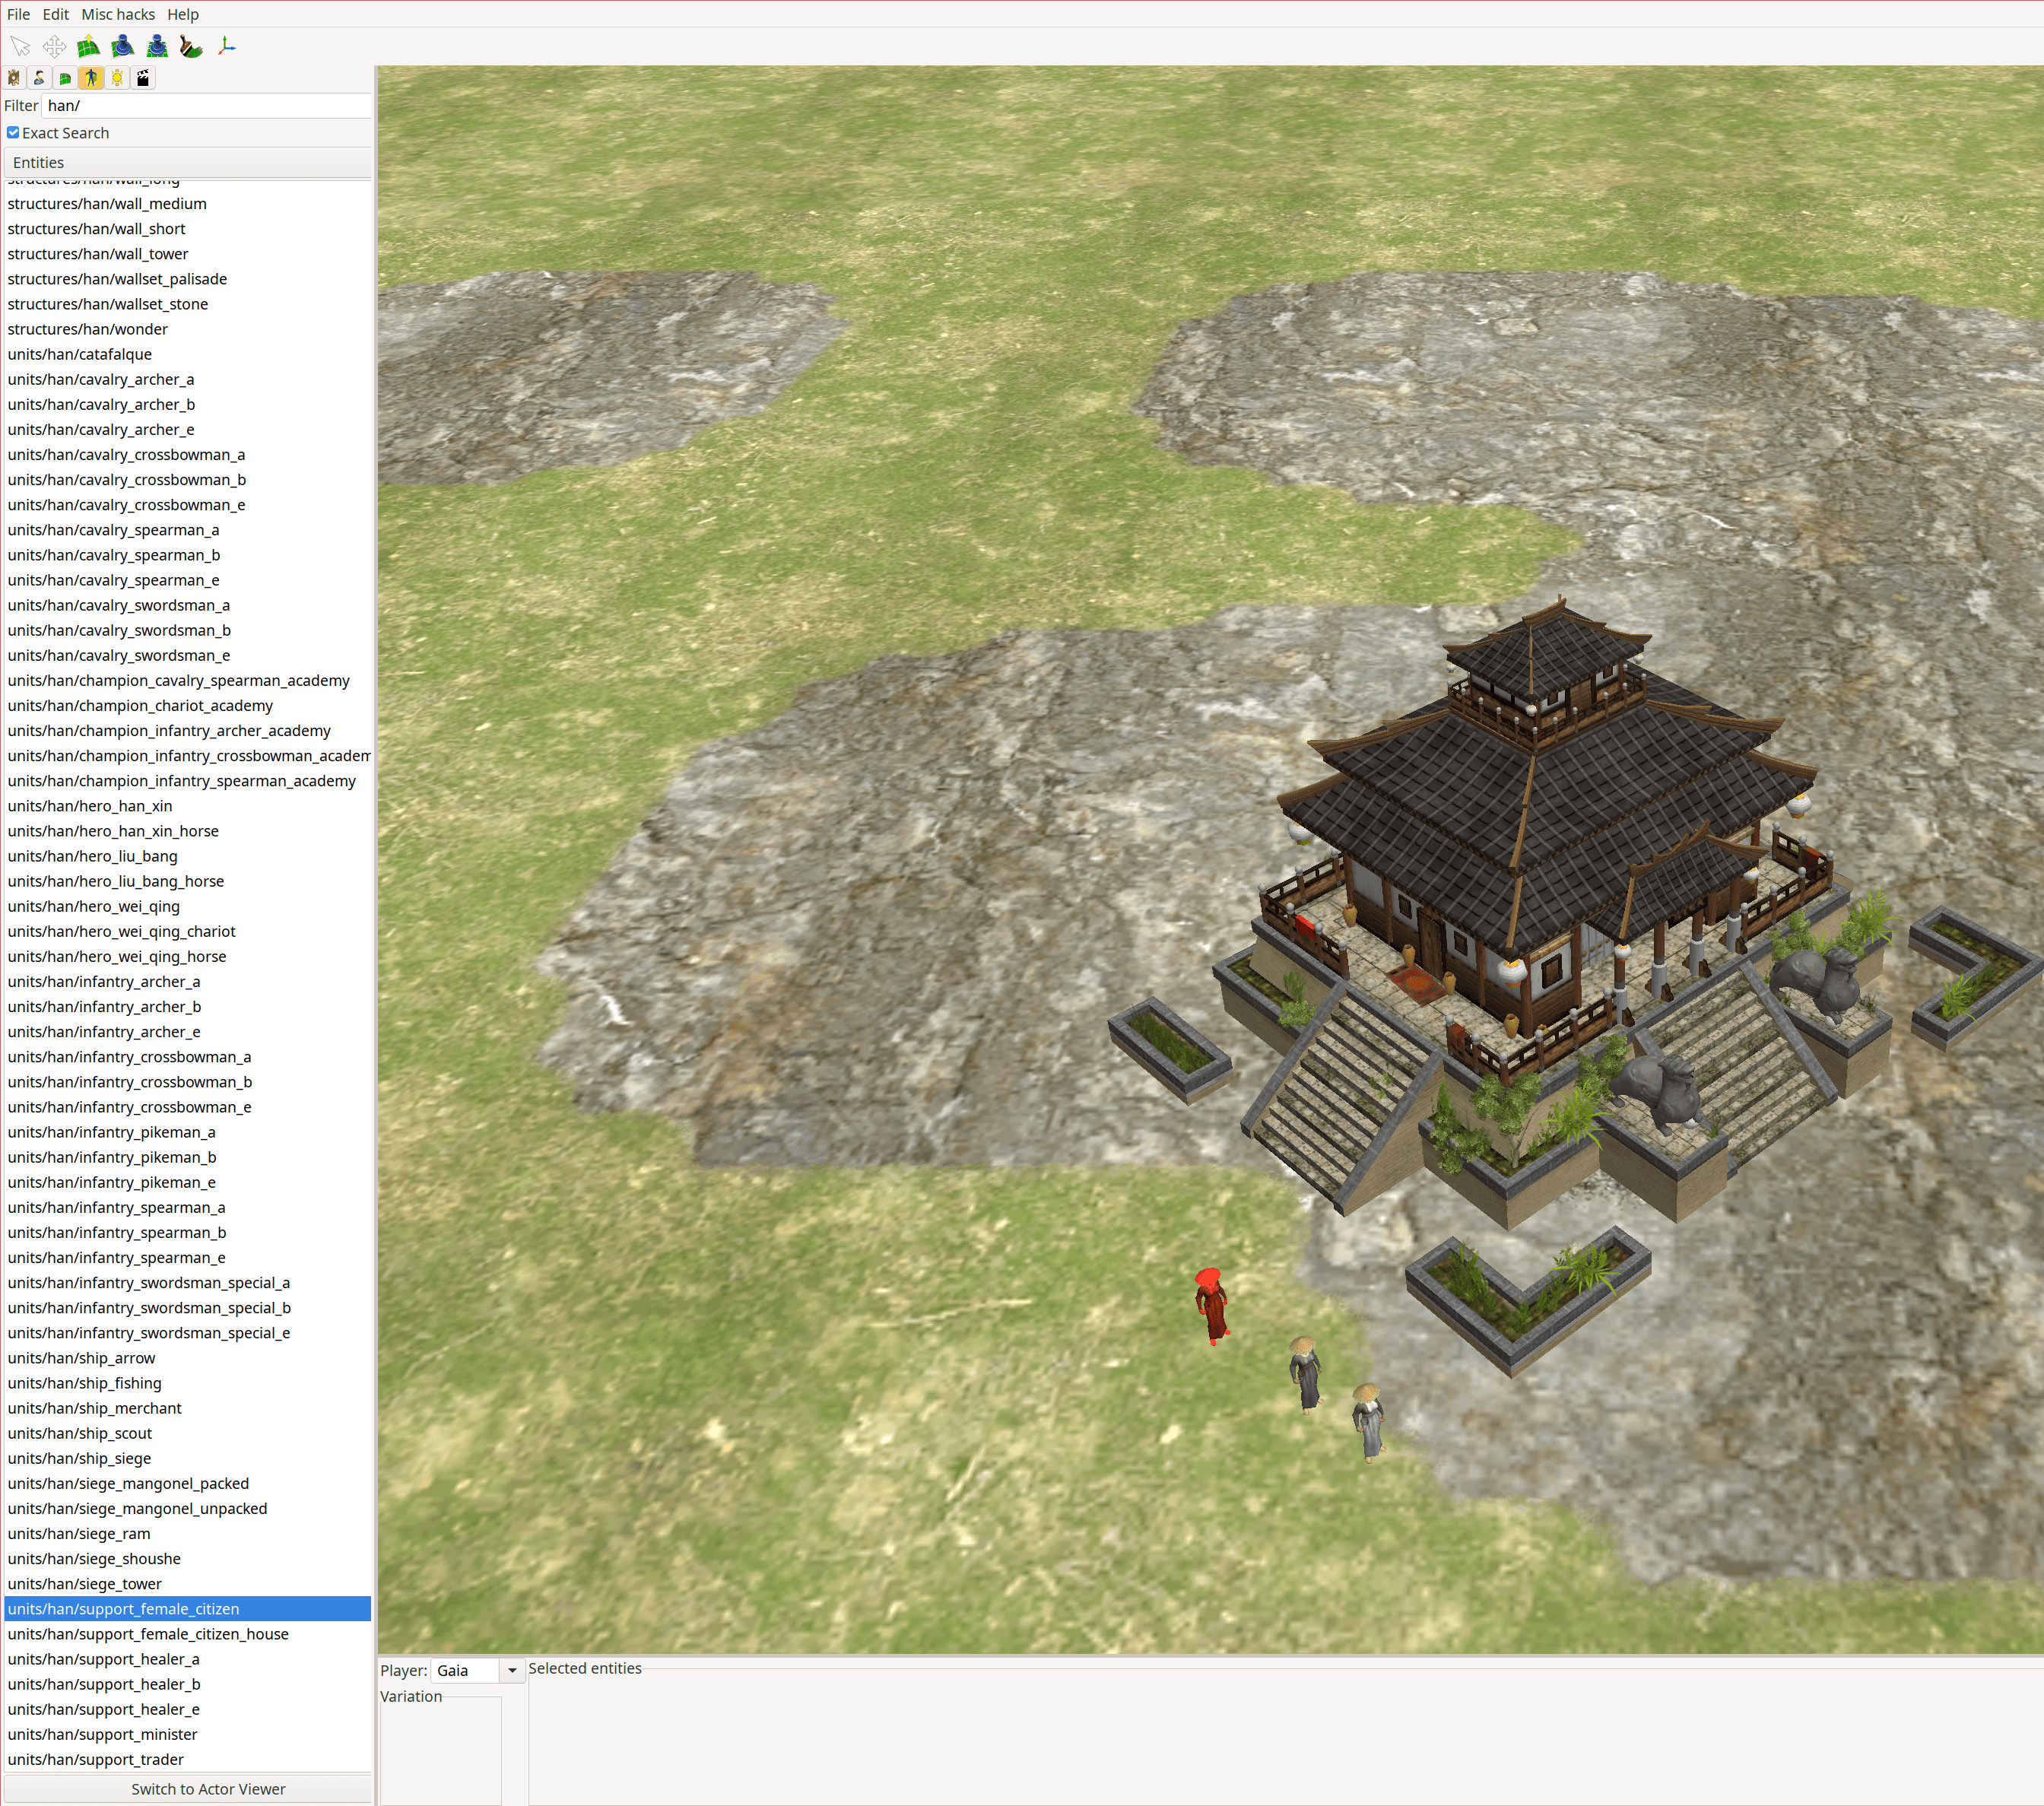
Figure 21. Adding sample Player 1’s civic center and female citizens.
For the Battle of Bibracte, you need to set up two civilizations: the Romans and the Gauls. For simplicity’s sake, you can assign one player per civilization (two total). Everything that you need to set up a game for two players with the correct civilizations and resources is located in the Player tab, whose icon looks like a small human face. First, click that tab. Then, set the number of players to 2. Finally, set Player 1 on Team 1 as the Gauls with the name ‘Helvetii’, and Player 2 on Team 2 as the Romans with the name ‘Caesar’s Legions’. Here, I give considerably more starting resources to the Romans than to the Gauls.
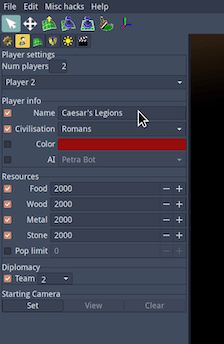
Figure 22. Adjusting the default player settings in Atlas’s Player tab.
Next, switch to the Object tab and, at the bottom of the screen, click Player 2 (the Roman civilization’s manager) to make them controller of the units. In a field by the main river to the south, you can add a Roman ‘castra’ (a specialty army camp structure). These are less advanced than civic centers, but allow the creation of citizen soldiers and some siege weapons. Do also place a proper civic center, mainly so that the Romans actually control their own starting territory. Then set a few citizen soldiers and a cavalryman, all filtered by ‘rome’ in the Object tab’s search bar:

Figure 23. Creating Rome’s starting position to the south of Mont Beuvray.
After switching to Player 1 at the bottom of the screen (in the Object tab), place the Gallic Fortress atop Mont Beuvray, and some Gallic infantry javelineers (citizen soldiers) and female citizens.
If you want to rotate units while placing them, keep the left mouse button pressed and move the cursor up or down. You can also adjust the rotation and location of any unit by clicking the four-way directional icon in Atlas, then clicking on the unit to adjust.
Although you’ll certainly adapt your use of these tools to your own scenario, the basic steps will remain the same.
8. Save and Distribute the Scenario
Having finished crafting the historical scenario, it is time to save it for distribution. First, click the gear icon to switch to the Map tab. Next, enter a name and a short (1-2 sentence) description for the scenario.
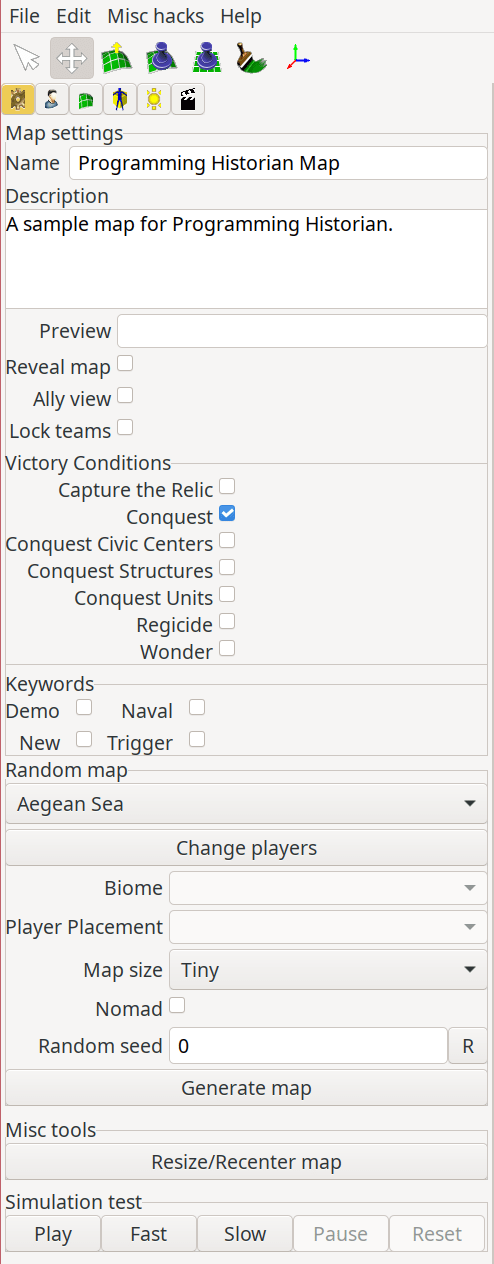
Figure 24. Saving a map with universal settings.
Finally, click File > Save, and type an easy-to-remember file name. Don’t change any information in the Random Map fields, because you are not making a random map. Custom scenarios are automatically saved in the game’s default mods folder, specifically /0ad/mods/user/maps/scenarios/.
To distribute the scenario, you’ll share the scenario’s XML and PMP files (two files) from that location with each person you would like to play with, instructing them to place both files in their own /0ad/mods/user/maps/scenarios/ folder. (If the maps and scenarios folders do not exist, just create them before pasting the files.)
9. Play the Scenario
You may now play your custom historical scenario, either as a singleplayer or multiplayer game. If this is the first time that you have set up a game in 0 A.D., I recommend that you read the Setting up a game Wiki article. For classroom usage, the Hosting / Joining a Multiplayer game sub-section will be most important.
After pasting the scenario’s two files into the correct directory on the second machine, return to the hosting machine. There, open 0 A.D. and click Multiplayer > Host Game. For Map Type, choose Scenario and click the All Maps filter before selecting the map you’ve just created (Bibracte, below). When the second machine joins by typing the host machine’s local IP address, this should be the result:
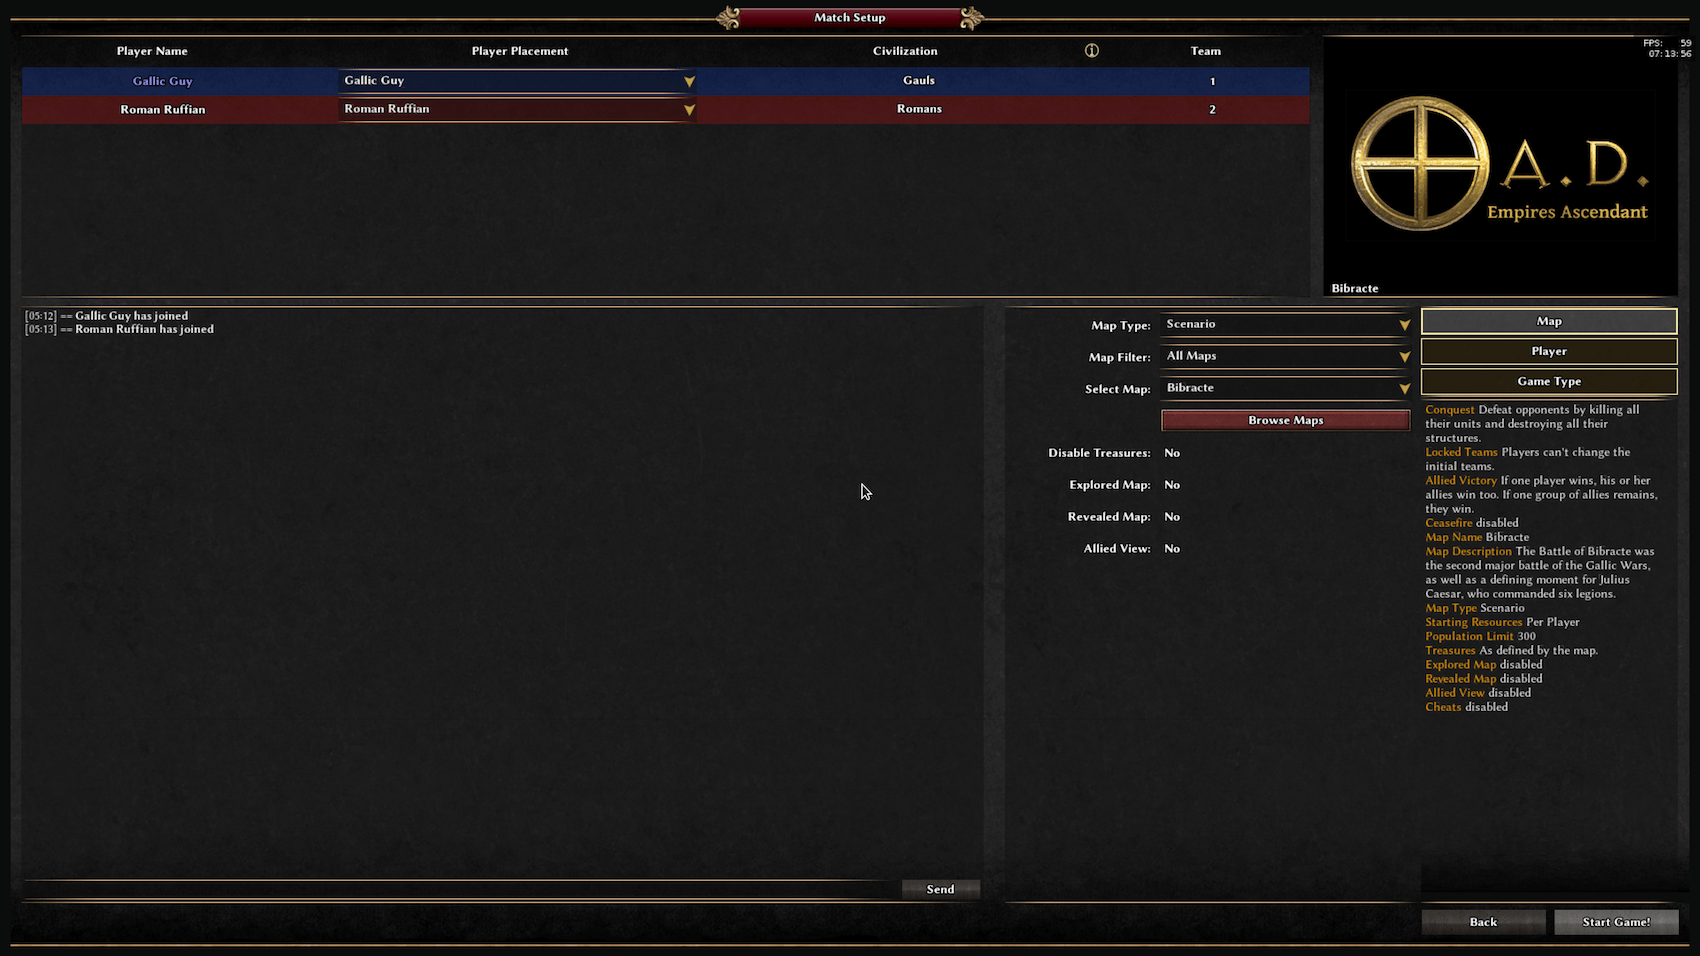
Figure 25. Hosting a multiplayer match with my custom scenario.
After Roman Ruffian (Player 2) clicks ‘I’m ready’, Gallic Guy (Player 1, the host) clicks Start Game, and the match begins:
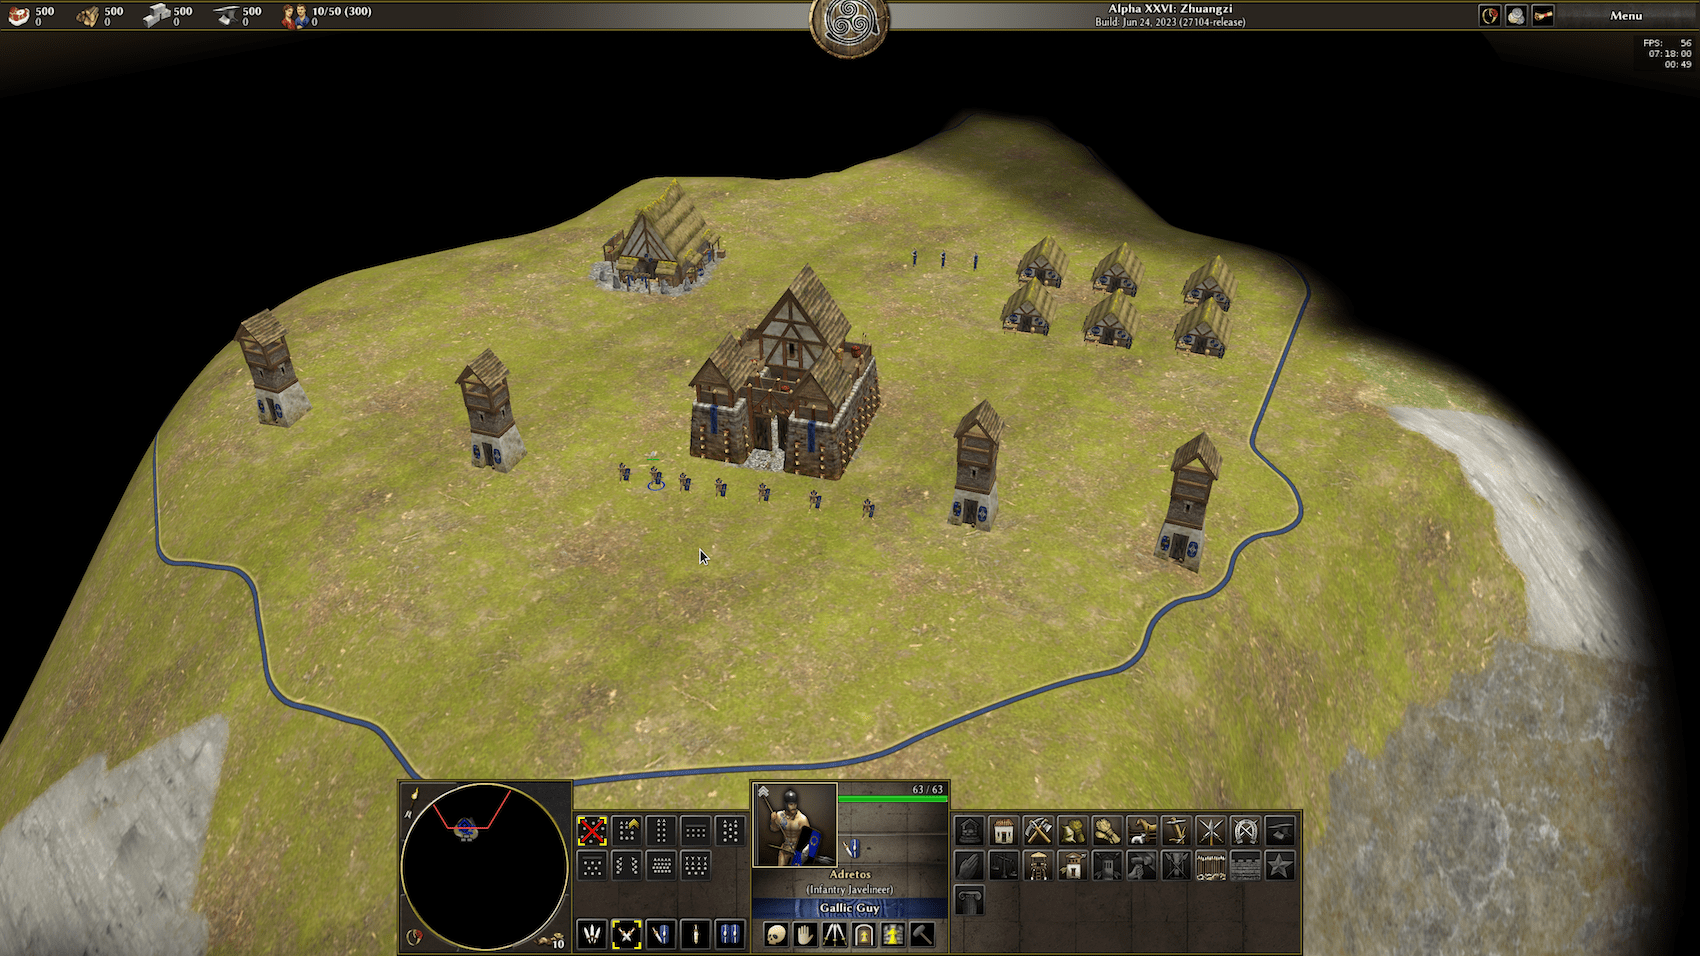
Figure 26. Player 1 is ready for battle from their fortress atop Mont Beuvray (as seen on the host machine).
Enjoy playful creativity in the classroom with a free and open source computer game!
Beyond: Join the Community, Build a Modification from Scratch, and More
The most advanced way to incorporate 0 A.D. into the classroom is to build a gameplay modification (mod) from scratch. You, the instructor, might wish to bring a wholly new civilization into the game. You might like to make a custom hero for one of the base game’s civilizations. You might assign mod-making as a class project. Regardless of what you should decide to do, your possibilities are only limited by the Pyrogenesis game engine’s own limits. The Modding Guide states:
0 A.D. has been designed from the beginning for ease of modding. Not just art and sound, but also the code which makes the game come to life. All the textures, 3D models, animations, sounds, fonts, and scenarios found in the game are packaged into ‘mods’ (modifications). Additionally, a large amount of the game’s logic (written in JavaScript) is packaged in mods.
I already have written about the two best sources of documentation for building a 0 A.D. mod from scratch: the official Wildfire Games Wiki and the Wildfire Games Forums. You should begin by reading the 0 A.D. Modding Guide and 0 A.D. Mod Layout entries, which themselves are cross-linked with information about what belongs where, which values change what settings, what sorts of 3D objects may be imported into the game, and more. The Game Modification Forum has many active members who are eager to assist each other. As long as you have attempted to find an answer to your question or solution to your problem yourself, and you have documented the steps that you have taken toward that end, you are likely to receive a helpful answer there.
The (Brazilian) Portuguese language Youtube channel Ágora 0AD also has a superb ‘How to Mod’ series, and you may find other information scattered throughout the web. Yet, since the 0 A.D. project only progresses by end-user upstreaming, I recommend that you contribute back to the Wiki and the forums, thinking of them as both the ultimate sources of truth for 0 A.D. modding and the final destinations for what you might uncover through your work on your modding activities.
If you have an idea for a new gameplay modification, read the Modding Guide and Mod Layout pages in the Wiki. Then, outline a plan for the mod before starting to work on it.
The 0 A.D. project points to the superiority of free and open source software over proprietary software for education. With a large playerbase whose members are devoted to realism, realism is more likely to be actualized than in, say, a traditionally corporate-backed game project. Further, 0 A.D.: Empires Ascendant is fully customizable – even able to be overhauled – for educational use. Limitless learning is better than limited learning.
Endnotes
-
Arnab, Sylvester, Samantha Clarke, and Luca Morini. “Co‑Creativity through Play and Game Design Thinking.” Electronic Journal of E-Learning 17, no. 3 (September 1, 2019). https://doi.org/10.34190/JEL.17.3.002. ↩
-
To achieve the smoothest possible experience in 0 A.D., you should install the game on a machine with the following specifications:
- a multicore AMD64 processor
- a recent discrete graphics processing unit (GPU, ‘video card’) or a gaming-oriented integrated graphics processor
- a solid-state drive (SSD)
- eight or more gigabytes (GB) of random access memory (RAM)
The base game requires approximately 3.5 GB of storage space, and you should have a few spare GB available after installing 0 A.D. and GIMP in order to complete this lesson. ↩
-
The 0 A.D. project is released under three open source licenses:
- Binaries (compiled): GPL 3.0
- Engine and code: GPL 2.0 or later
- Artwork, music, and other non-code resources: CC BY-SA 3.0
-
GIMP occupies about 250mb of storage space. It is licensed under the GPL 3.0 or later. ↩
-
There is a superabudance of evidence that persons learn best with multisensory activation. For one summary discussion of the matter, see Scudellari, Megan. “The Science Myths That Will Not Die.” Nature 528, no. 7582 (December 2015): 322–25. https://doi.org/10.1038/528322a. ↩
-
This sub-lesson on importing real-world geographic data into 0 A.D. to create realistic historical scenarios is based on the Youtube channel Tom 0AD’s comprehensive video tutorial on terrain importing and “Palaxin’s Heightmap Guide” in the Wildfire Games Forum. Additionally, I am indebted to my international colleagues who provided feedback after my November 19, 2023 presentation “How to Incorporate Real-world Data into the Scholarship-Aware and Libre Computer Game 0 A.D. for Ancient History and Language Instruction” in the Digital Humanities in Biblical, Early Jewish, and Christian Studies Unit at the 2023 Annual Meeting of the Society of Biblical Literature in San Antonio, Texas. ↩
-
As of May 2025, the Wikipedia article about the site of Mont Beuvray is only available in French. ↩
-
Different releases of GIMP can have minor variations in specific language, UI elements, etc. Keep that in mind if anything might look slightly different in this tutorial’s screenshots of GIMP (which were taken in Debian 12 with the version of GIMP that is available in the official Debian repository) relative to what you see in your own GIMP installation. ↩